
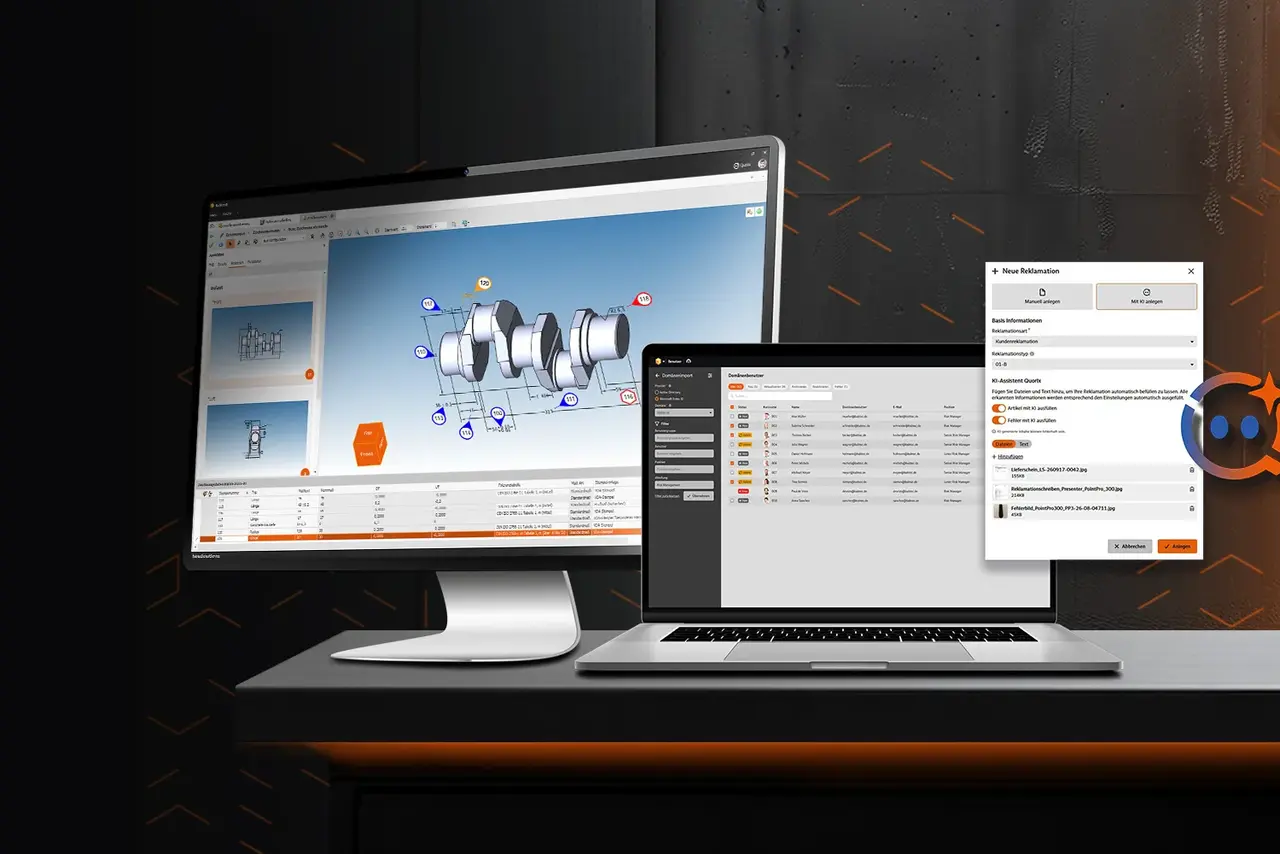
Release 8.4
From Us to You: Highlights in the New Release

Administration
For security reasons, when configuring the Exchange Online connector in the administration console, it is no longer necessary to upload a physical certificate file generated with a specific password. Instead, a thumbprint field is used to retrieve the certificate from the local store where the server certificate is installed.
For security reasons, when configuring Entra ID login in the administration console, it is no longer necessary to upload a physical certificate file generated with a specific password. Instead, a thumbprint field is used to retrieve the certificate from the local store where the server certificate is installed.
Organizational structures and processes in quality management and quality assurance often follow similar principles, so standard software provides excellent support for day-to-day tasks in many companies. However, every company has its own unique processes – and it is this uniqueness that makes all the difference. That is why the Babtec modules can be customized as needed.
Because the Babtec software of the future will be browser-based, the previous release, 8.3, marked an important milestone: a new framework that also allows for customization of modules in BabtecQ Go.
So, if additional function calls (buttons in toolbars), custom (user-defined) database fields are needed to maintain and display supplementary information in input dialogs, on tiles, or in filter dialogs, or if the information requirements can only be met using company-specific reports, queries, and views – then such customizations are now possible in the following modules and catalogs:
- Employee Qualifications and Training Courses
- Qualifications, Qualification Profiles, and Employee Groups
- Documents and My Documents
- Users and User Groups
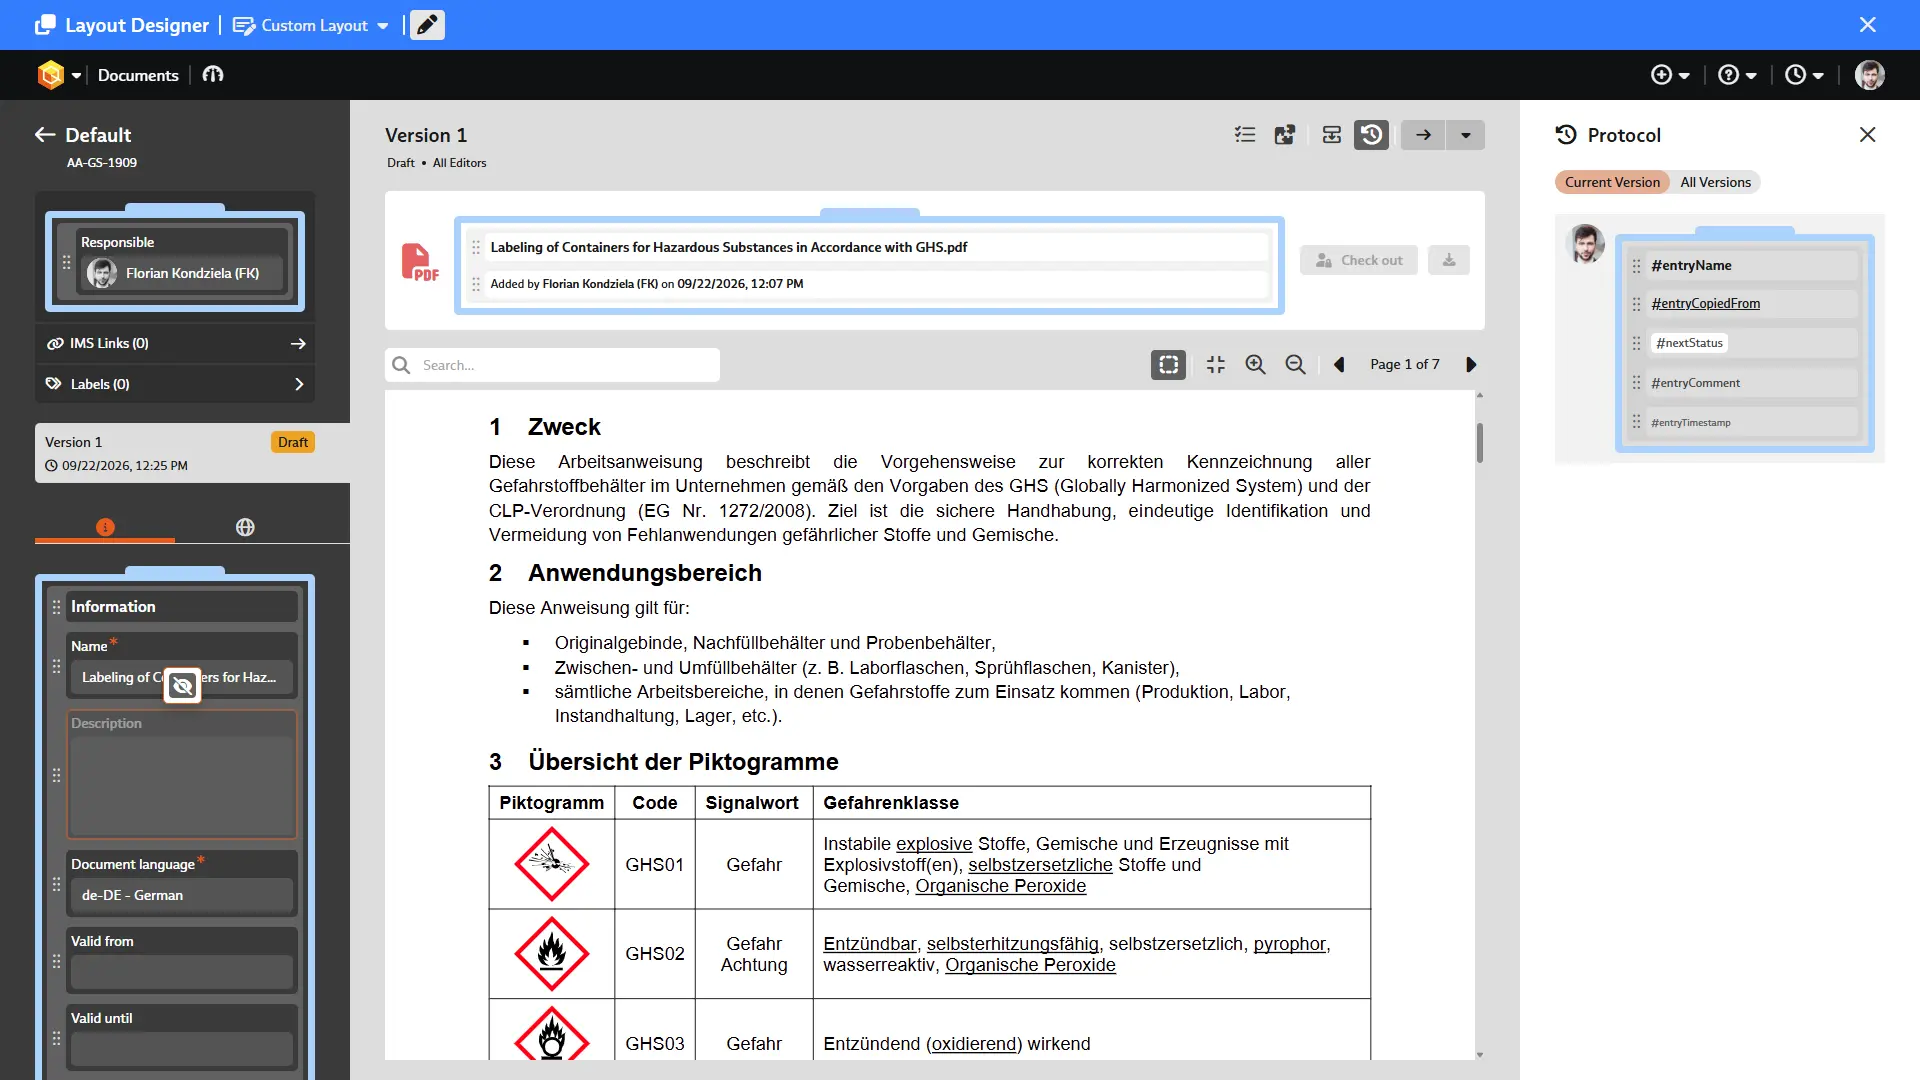
In the modules mentioned above, you will now also find the new “Layout Designer,” which allows you to easily customize pages, dialog boxes, filters, and tiles on your own. Customizable areas are highlighted by blue “containers.” Within these marked areas, interface elements – such as existing input fields, user-defined fields, or elements newly added via Customizing – can be rearranged using drag-and-drop. Optional elements (e.g., input fields that are not defined as required fields) can also be specifically hidden or displayed.
A note: To open the Layout Designer, you need the "Start Layout Designer" permission – the command is located on the far left of the menu bar.
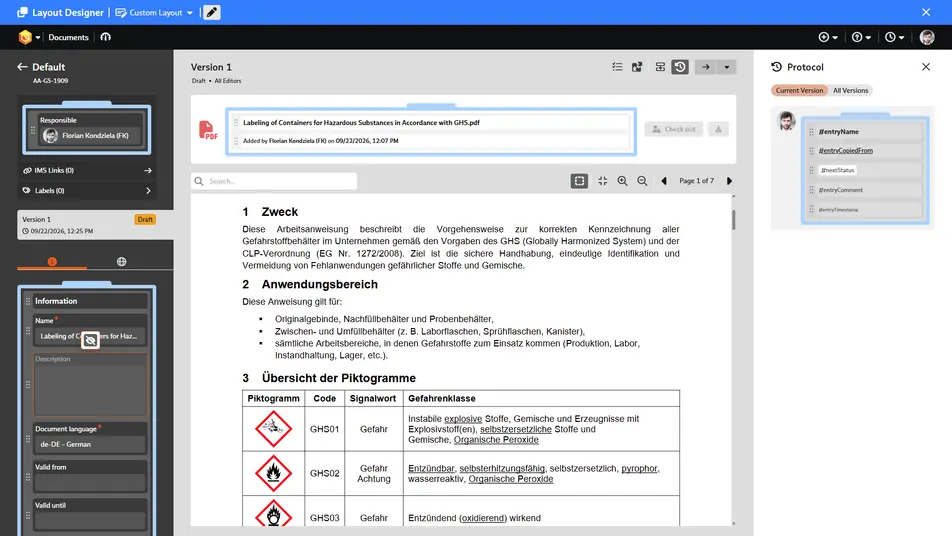
Layout Designer enabled in BabtecQ Go – shown here in the Documents module
In connection with customizations to the standard software, the properties of data fields can also be defined individually in the “Metadata” administration module – for example, to designate a field as required or to specify the format of additional “user-defined fields.”
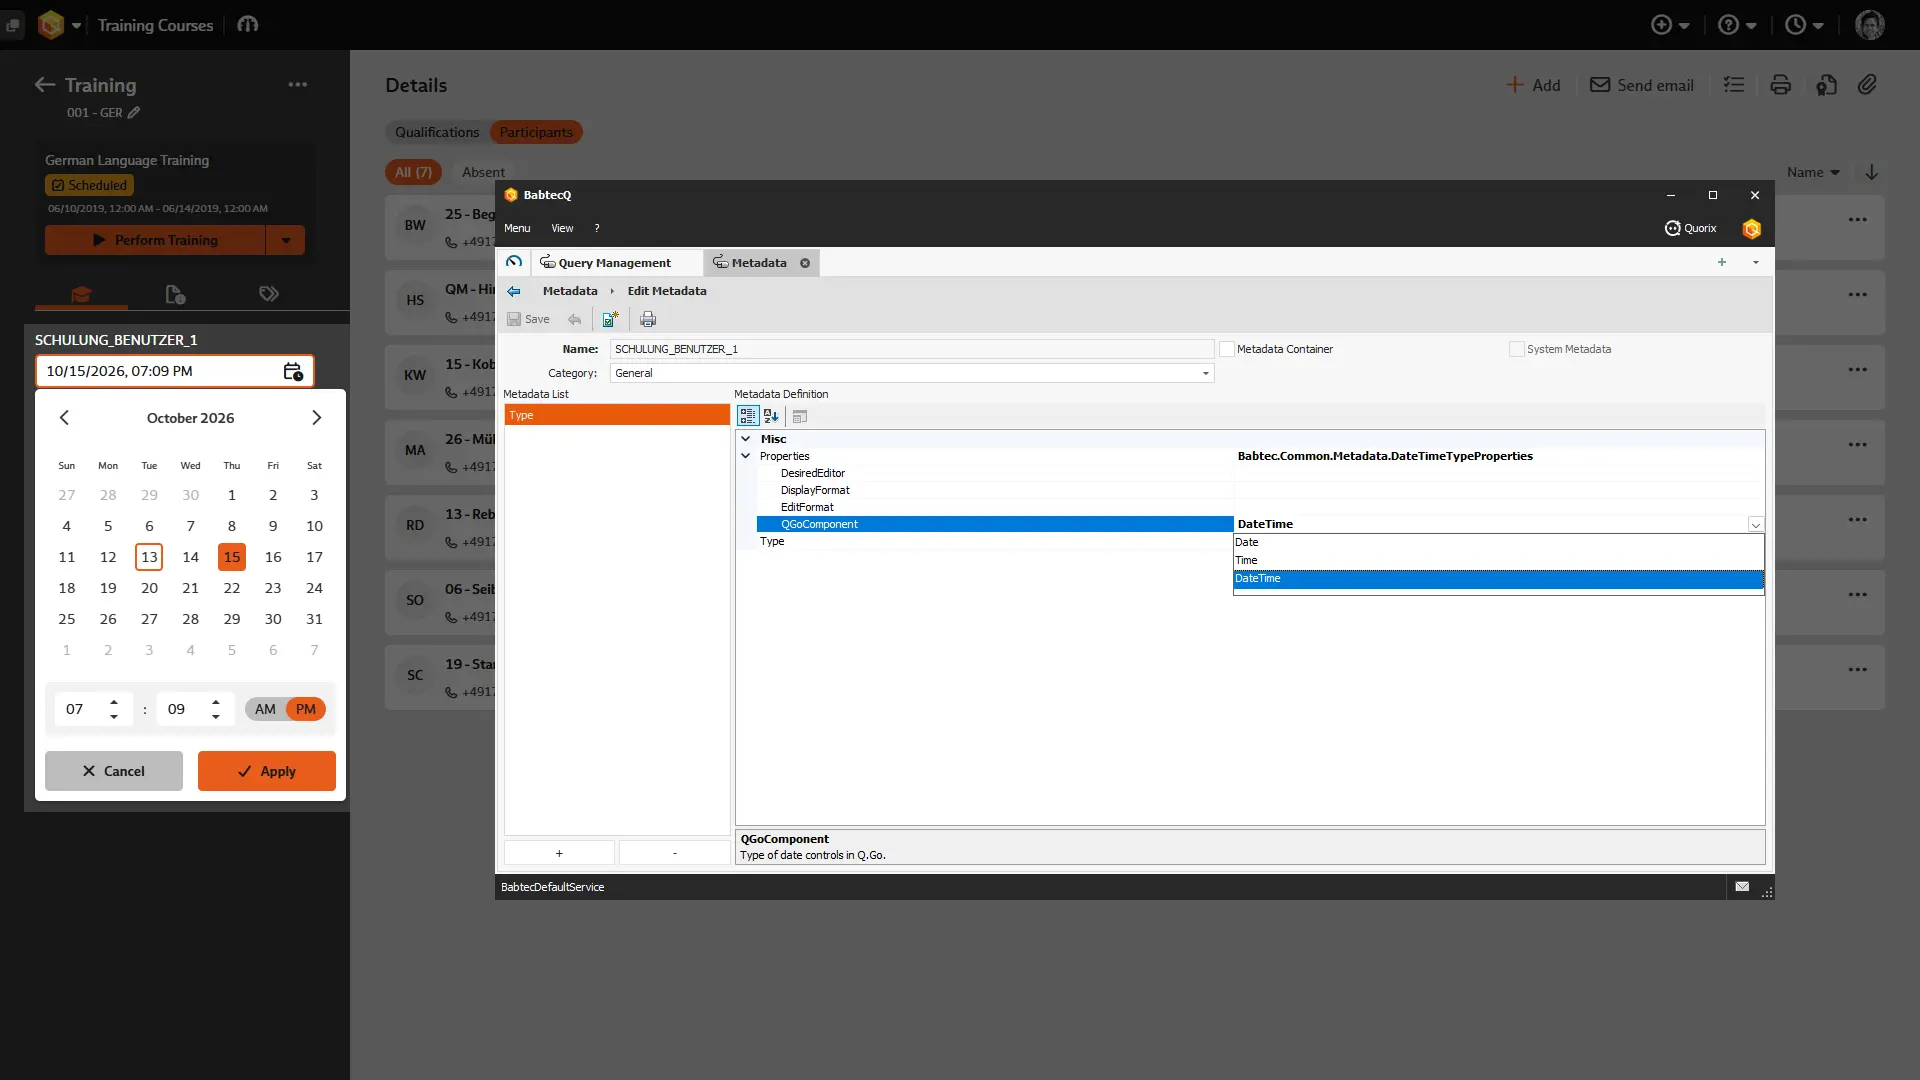
This defined metadata is now also supported in the existing customizable BabtecQ Go modules. To this end, the metadata definition provides appropriate new control components (QGoComponent) for each of the following types, allowing the data fields to be displayed in the user interface in accordance with the metadata definition:
- Domain, with options for single and multiple selection – this allows you to specify whether a single entry or multiple entries can be selected and added to the field.
- Integer, with options for entering and displaying integer values (Numeric), checkboxes, and switches – this allows the various data types and controls in BabtecQ Go to be displayed and used consistently.
- Time and DateTime, with options for date (Date), date and time (DateTime), and time (Time) – this allows dates and times to be conveniently and consistently recorded and displayed in BabtecQ G.
- LookUp for selecting users or catalog entries, which supports either single selection or multiple selection – this allows you to specify whether a single entry or multiple entries can be selected and transferred to the field.
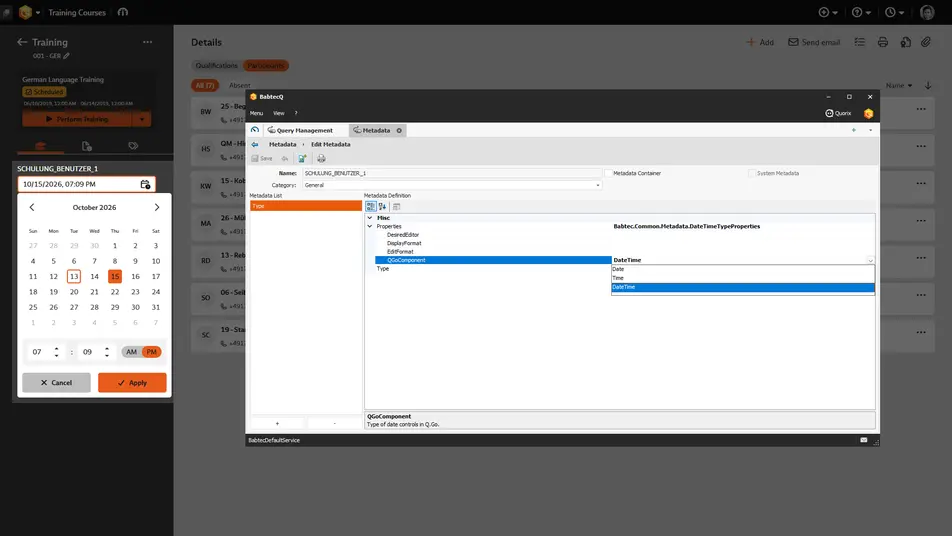
Example of the definition of metadata – here of type "DateTime" for a new custom field in the "Trainings" module
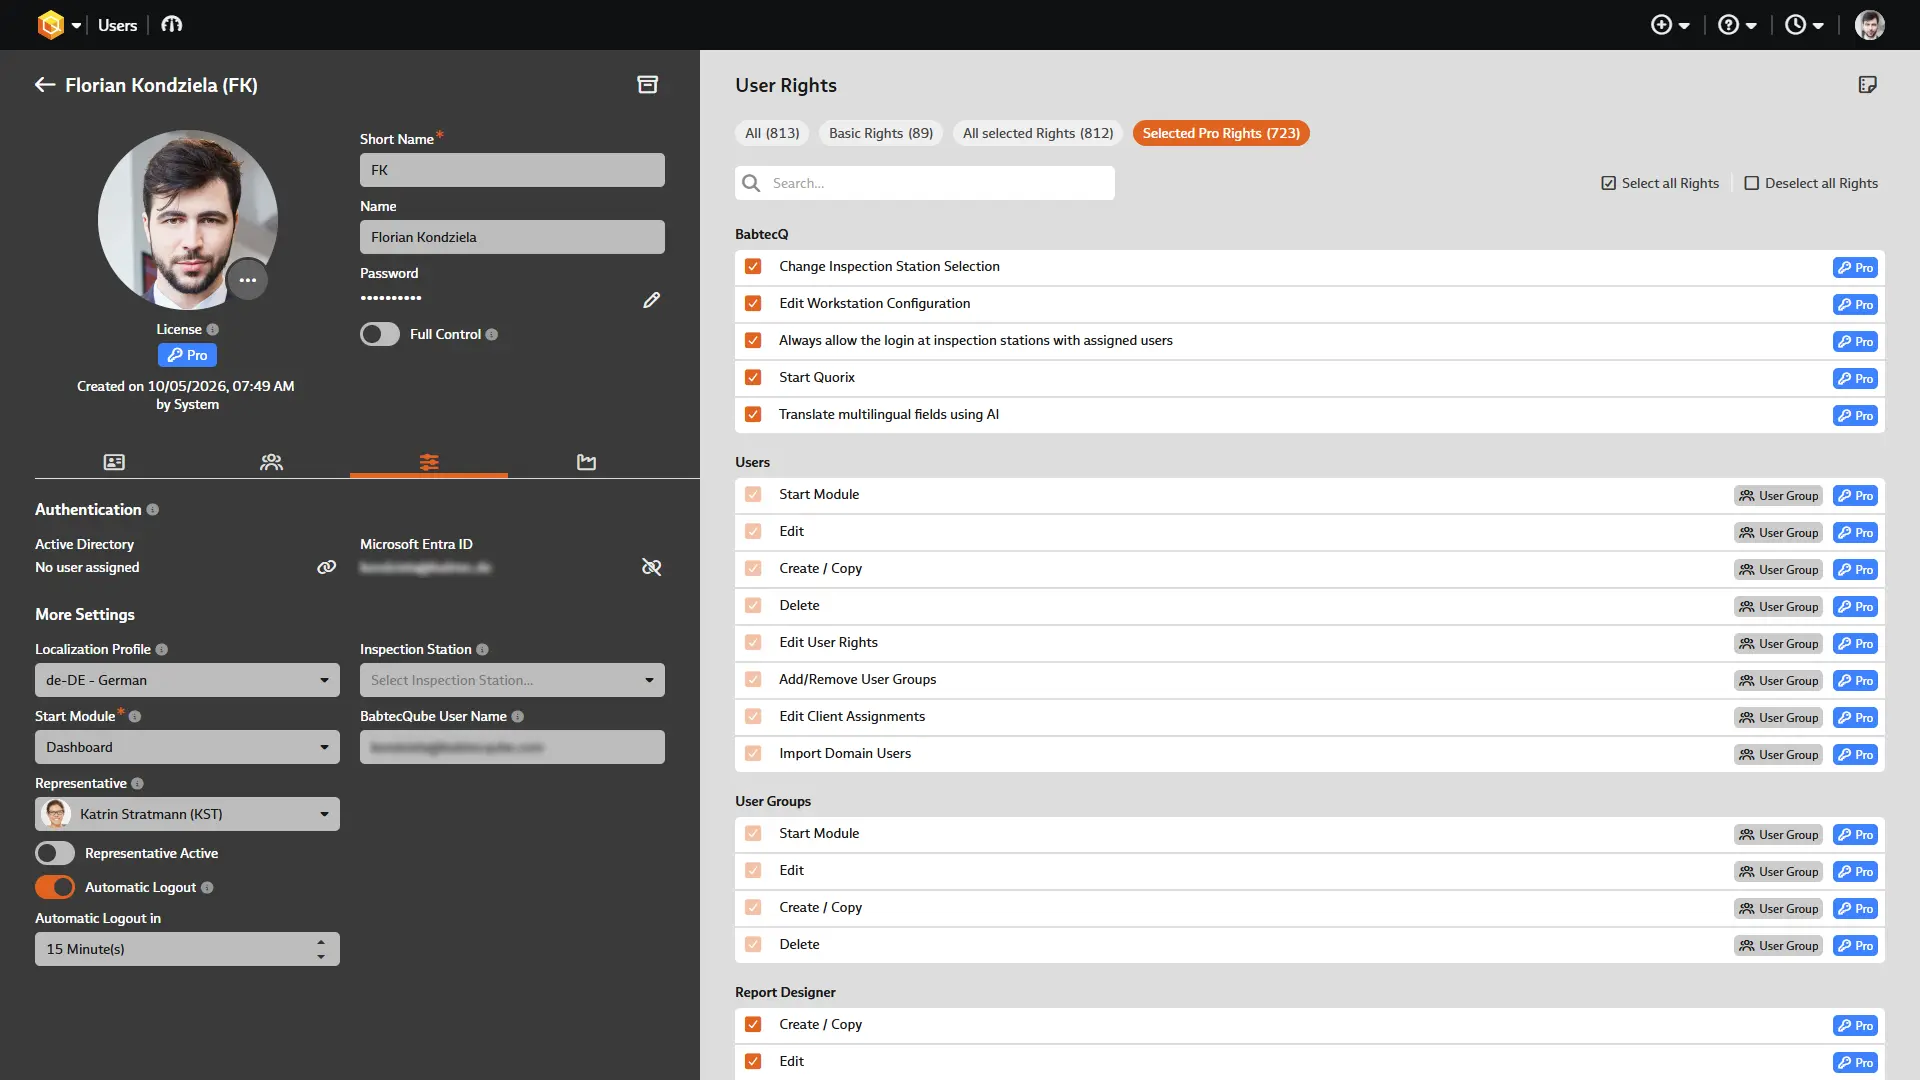
Administrators responsible for user management and maintaining access permissions for the Babtec software no longer need to have the BabtecQ Windows client installed. The required “Users” and “User Groups” modules have been moved to the browser as of Release 8.4.
The “Users” module continues to be used to manage all individuals authorized to use the modules and features of the Babtec software. Existing domain users can be utilized to create users and import centrally maintained master data into the Babtec software. For managing access permissions, it is still recommended to use the “User Groups” module and to inherit permissions by assigning users to groups.
The new modules in the browser make it easy to use – even on mobile devices – and offer a clearer layout, for example:
- The list view of users has been expanded to include, among other things, information on status, department, and position.
- User permissions are now displayed in a single list grouped by module. Only permissions for licensed modules are available there, and for each permission, it is indicated whether it requires a Basic or Pro license..
- The filter chips make it easy to quickly see which permissions are enabled for a user group or a specific user, and which permissions require a Pro license.
- Inherited rights from a user group are now clearly marked – and information about which user group they come from is quickly available here based on the short name and name.
More information: “Optimized Management of Domain Users” and “Batch Editing of Users” (see below)
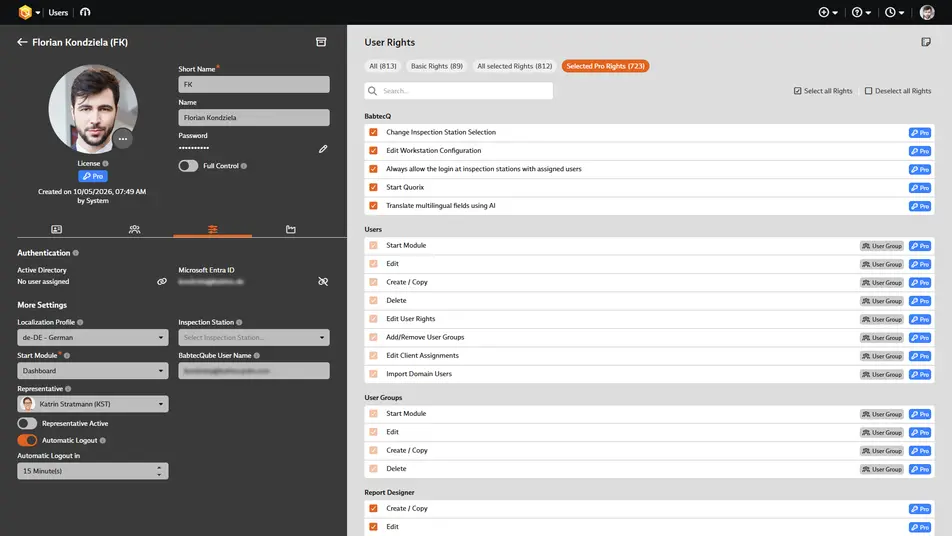
User with master data and access permissions
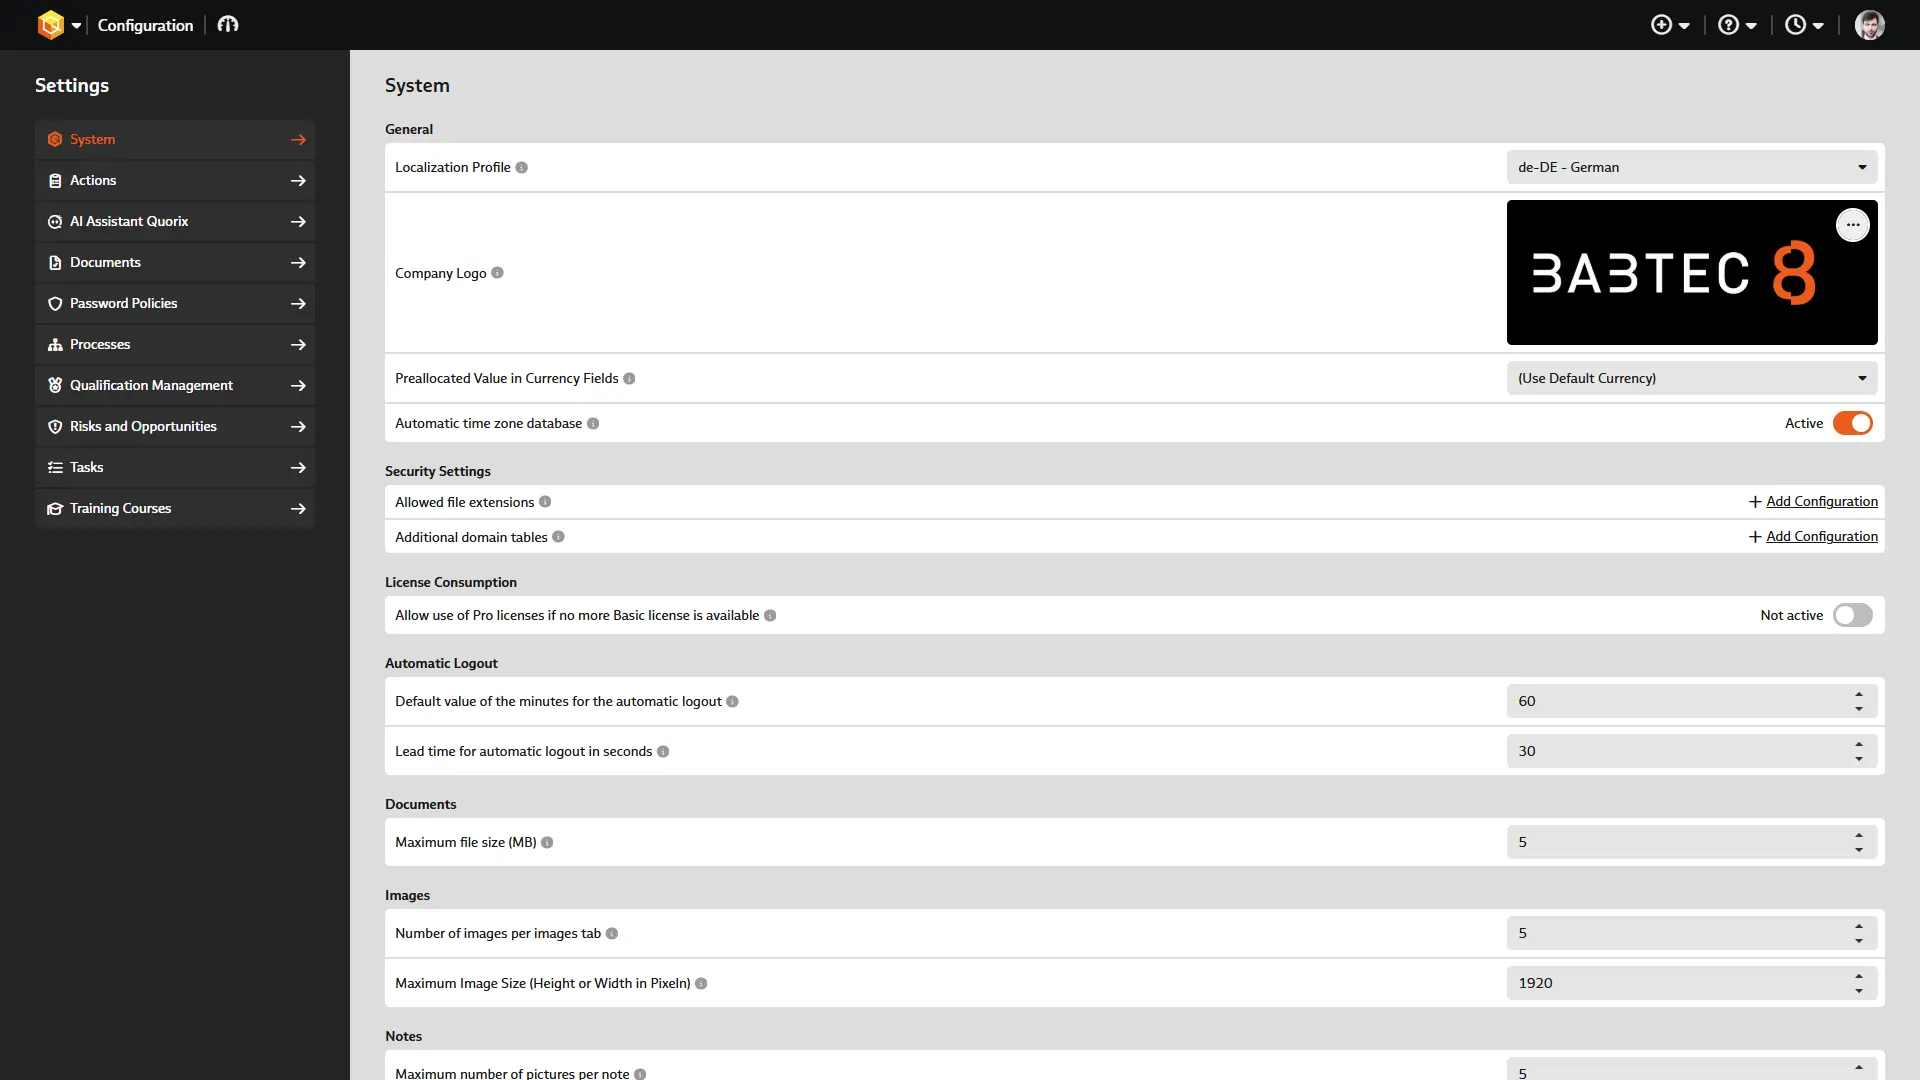
With Release 8.4, you now have the option – for the first time – to make settings for system configuration or for configuring a BabtecQ Go module directly in our browser-based front end. Administrators need the “Start Module” permission to do this.
A note: You can still find the module for managing configuration settings in the Windows client. All configuration settings are still available there – whereas in BabtecQ Go, in addition to the system settings, you can “only” configure the modules that are available in BabtecQ Go.
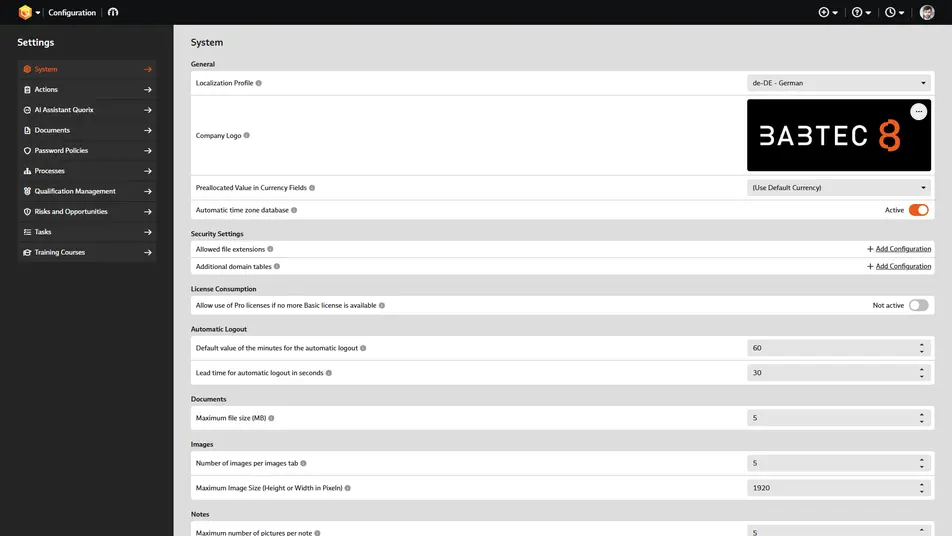
New administration module for the configuration of system and modules in BabtecQ Go
A new configuration parameter called “Batch Print” (under “System,” category “General”) is now available for the print function in the modules for part approval processes and complaints. This parameter determines whether the “Print” function opens the view where individual reports and documents can be conveniently combined into a single report (by default), or the view for selecting a specific existing report.
This parameter was introduced so that, if necessary, these two modules can retain the behavior familiar from other modules – in particular, to allow users to continue using customized reports with parameter input as usual.
Users can change their own password in the Account Manager if necessary.
To this end, the licensing requirement for the existing user right “Change My Password” has been updated: A Babtec Basic license is now all that is required to use this feature, both in the Windows client and in BabtecQ Go.
More information: Account Manager in BabtecQ Go: Change Your Password
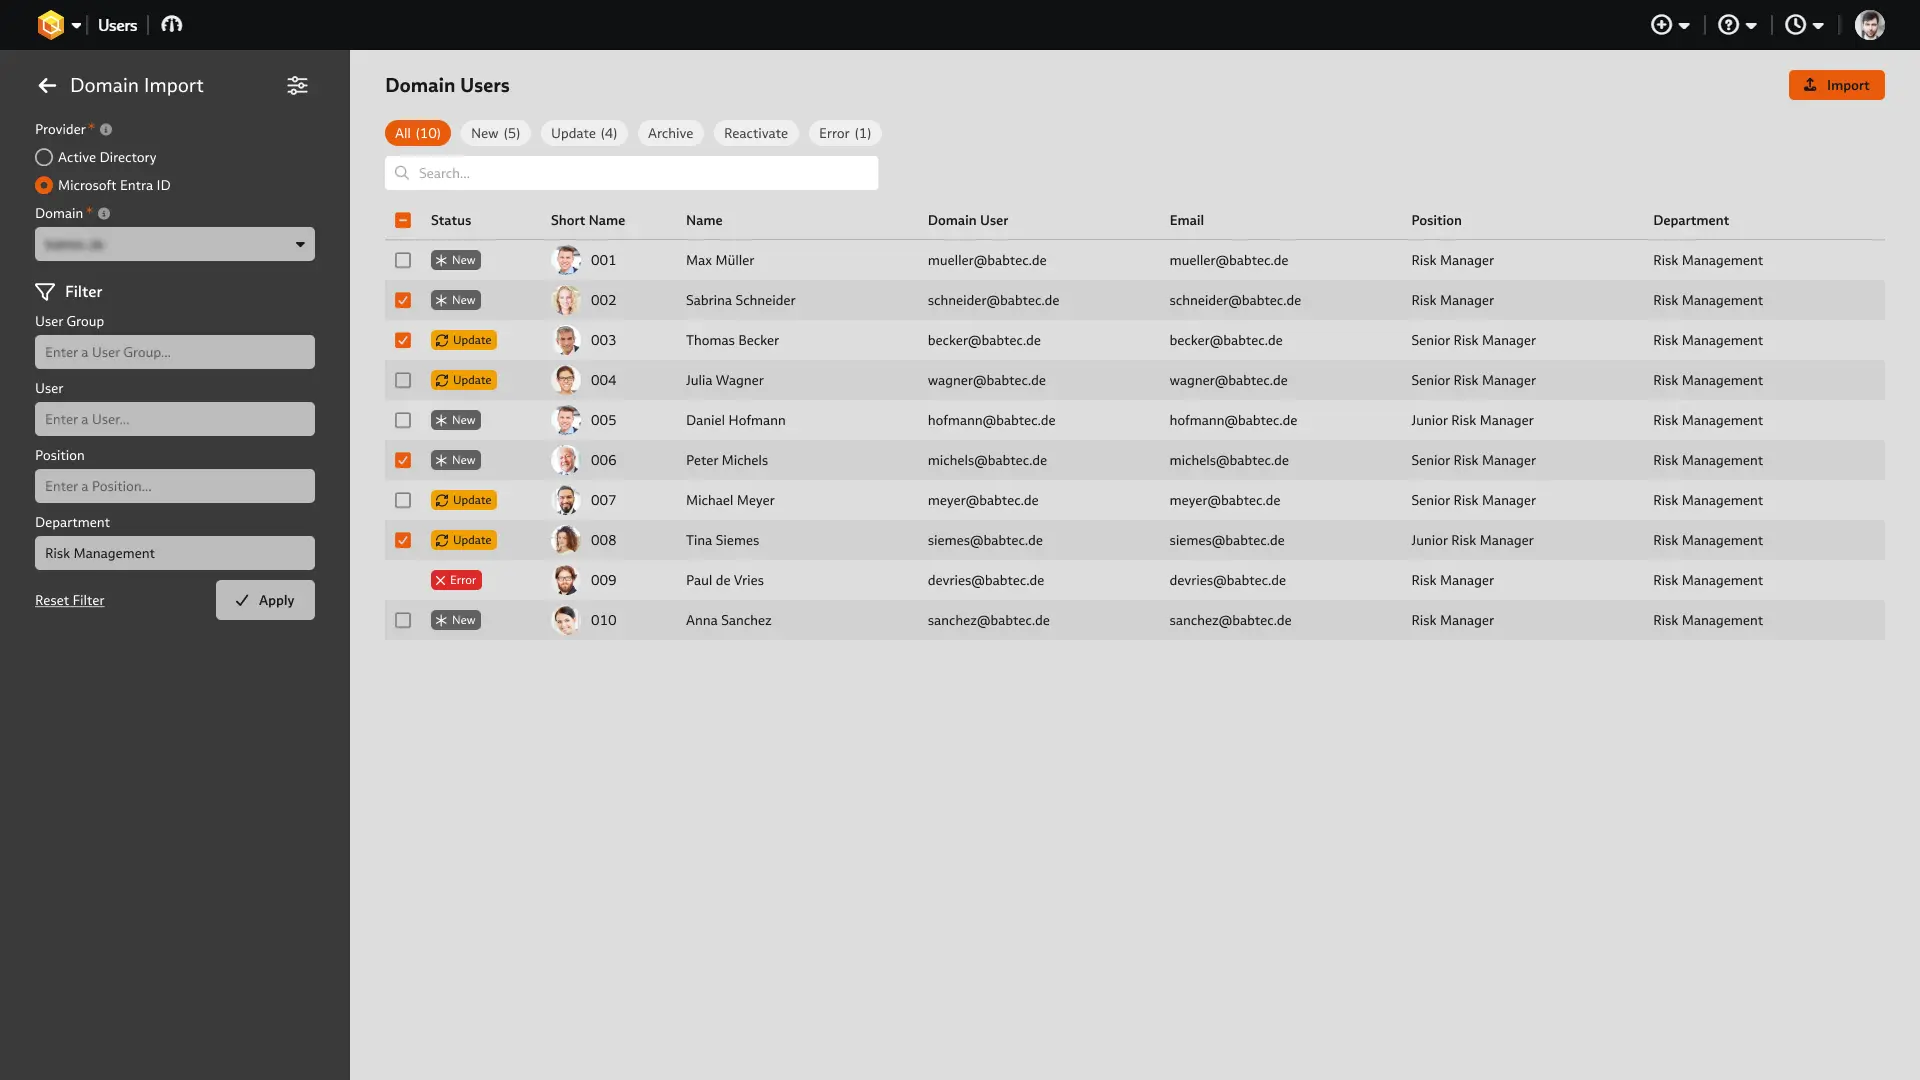
To reduce loading times, you can now use a filter to pre-select which domain users should be made available for import when importing domain users (from Active Directory or Microsoft Entra ID). You can filter the preselection by user group, user, job title, and/or department.
In addition, the department and position can now be imported from the domain. In the import settings, you can also customize the default field mapping if needed.
- By default, the department is taken from the "department" field.
- By default, the position is retrieved from the "jobTitle" field (Microsoft Entra ID) or the "title" field (Active Directory).
Starting with Release 8.4, synchronization with the directory service for Babtec users who are linked to domain users is based on the unique external ID (Object ID or Security ID). This ensures that name changes – such as those resulting from marriage – are now also taken into account.
A note: For users who are already linked but do not have this ID, the ID will be applied retroactively during the first synchronization after the update to version 8.4.0.
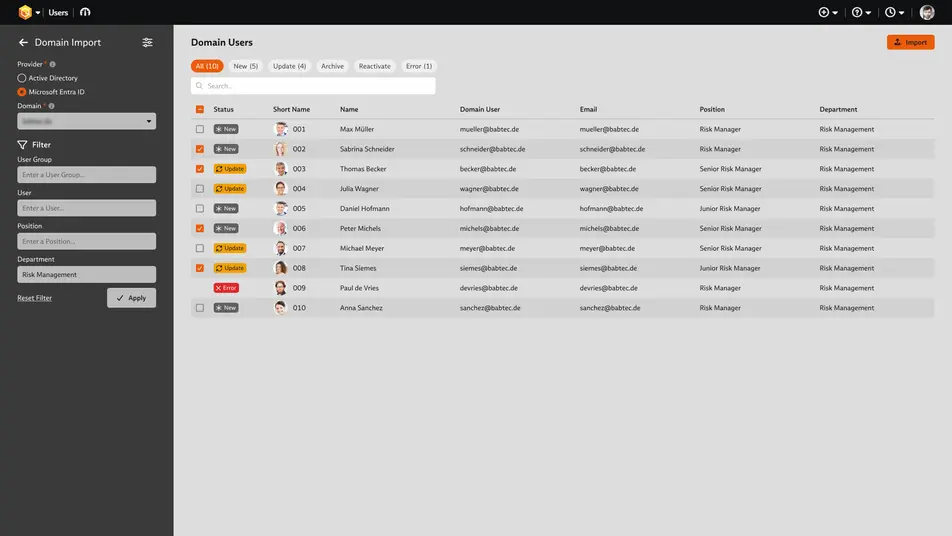
Import and update of domain users (from Active Directory or Microsoft Entra ID) in the new browser-based user management
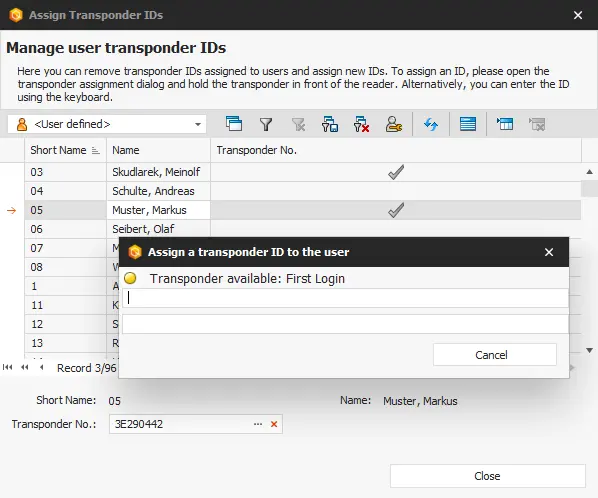
The function for assigning transponder IDs to users, which was previously available in the user directory, has been moved to the BabtecQ menu as of Release 8.4.
The "Assign Transponder IDs" function remains visible there only if a reader has been configured on the workstation computer. In addition, the user permission to edit users is required to execute the function.
By making this feature available separately, it is now easier and more time-efficient to assign personal transponders to multiple users one after another.
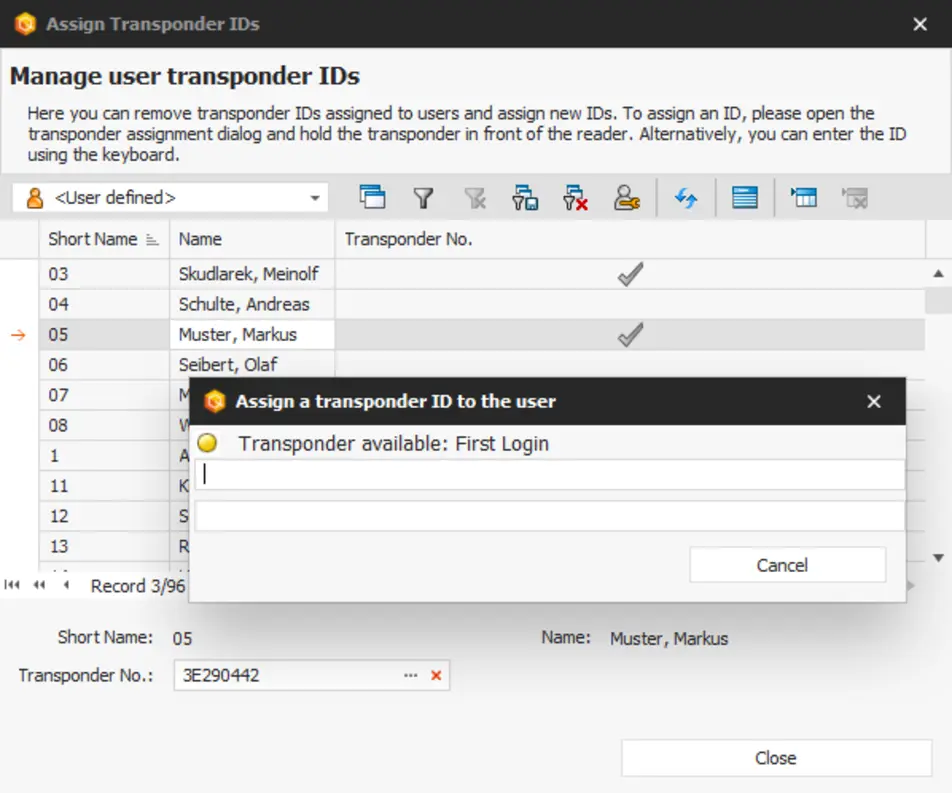
Function call "Assign Transponder IDs" – now in the BabtecQ menu
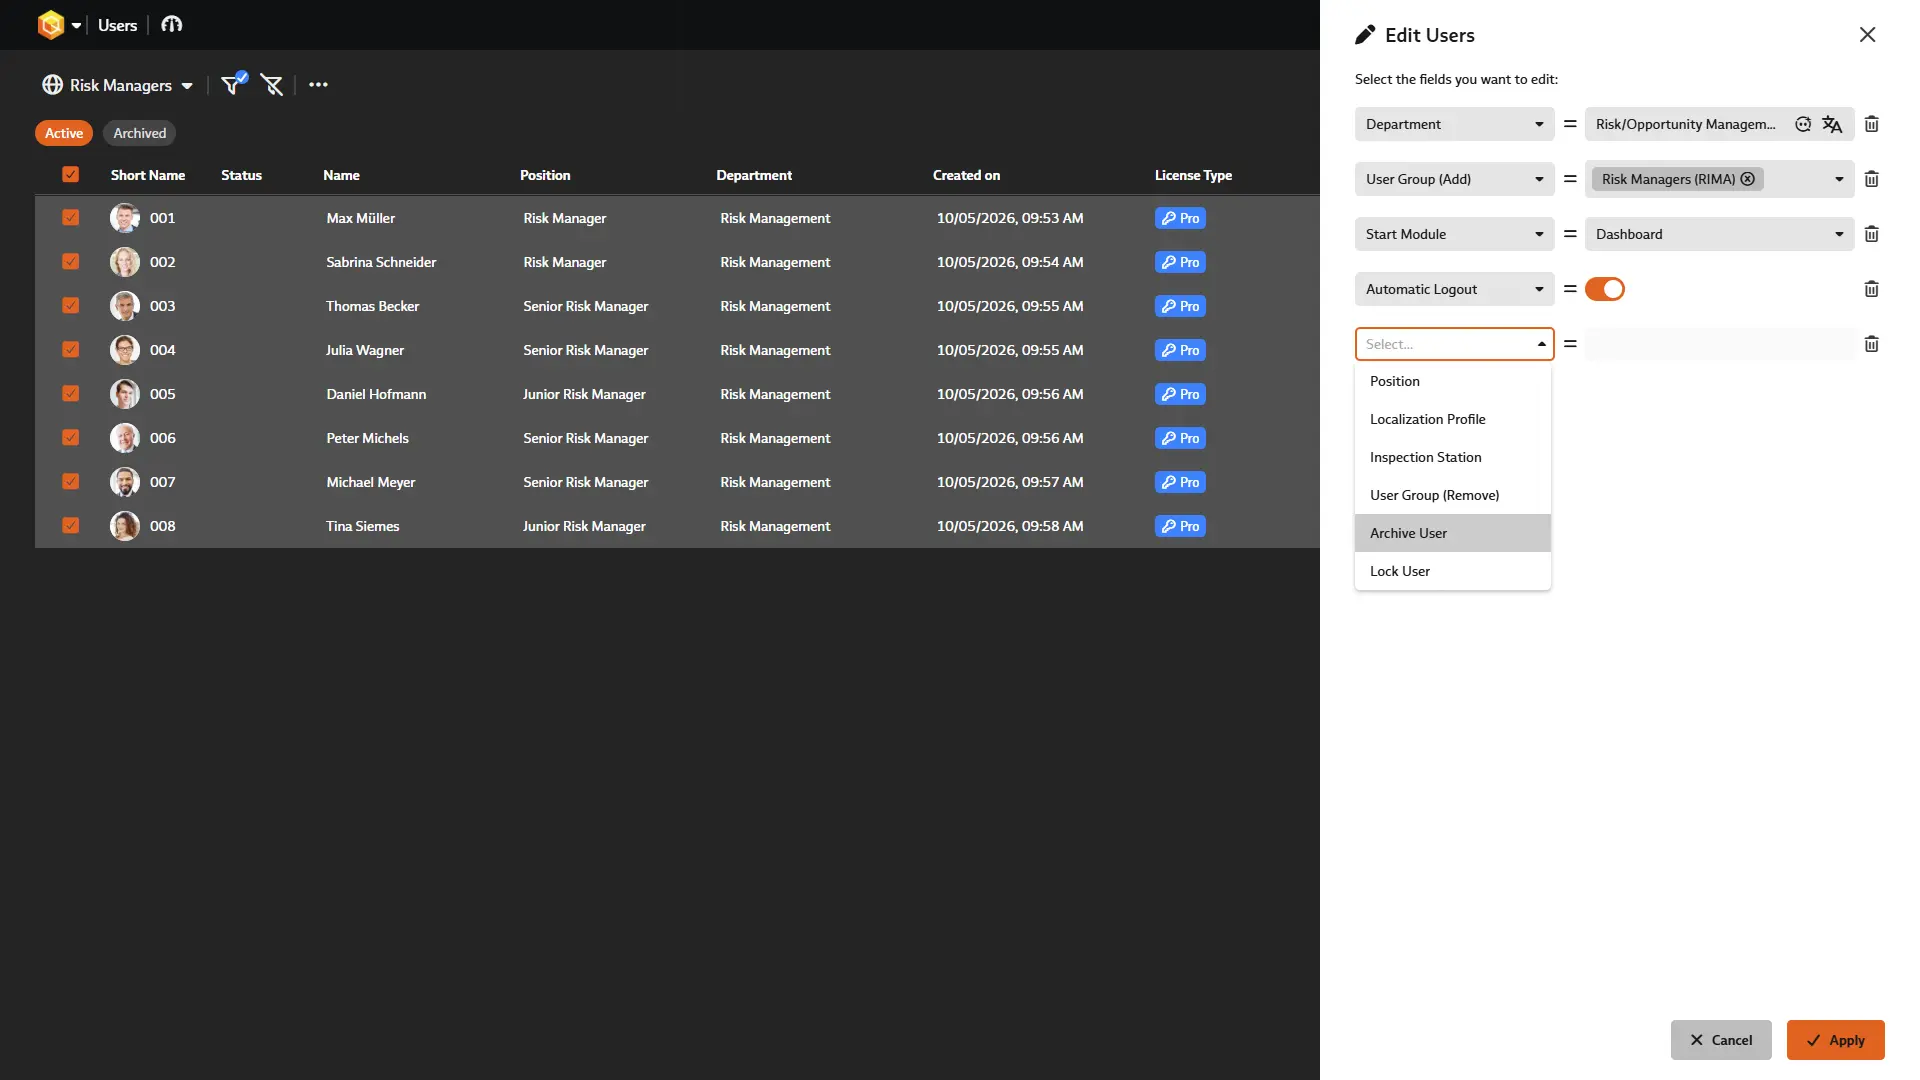
In the list view of the new user module, you can enable "Multiple Selection" in the toolbar to assign master data – such as the department, the localization profile, and one or more clients – directly to all selected users.
A note:Clients are assigned to selected users using the “Edit Client Assignments” authorization - “Full Access” is no longer required.
This way, for example, multiple new users can be assigned very quickly to one or more specific user groups, so that these users immediately receive all the intended access permissions. Archiving or temporarily suspending specific users can now also be done quickly.
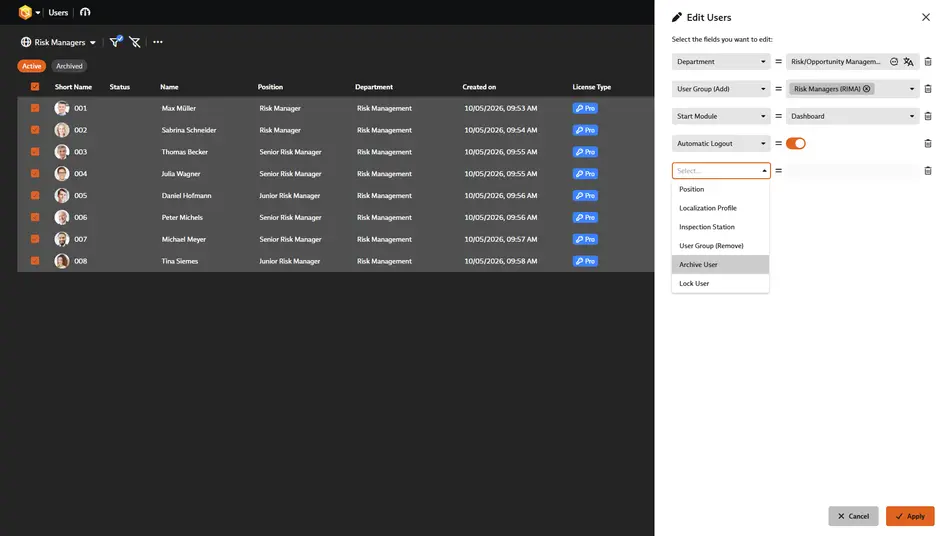
Change selected information directly for multiple users
General Information on Operation
Our browser-based front end, BabtecQ Go, is continuously being developed based on a design system and complementary UX guidelines. It defines clear rules and bricks for the design and operation of all applications in BabtecQ Go, ensuring that you experience a consistent look and feel and recognizable interaction patterns – no matter which module you’re working in. We are deeply committed to making the new software modern, intuitive, and user-friendly for you.
If you have primarily worked with our Windows modules up until now and initially find that using the modules in the browser feels “different,” you’ll notice that many workflows have been intentionally standardized, made clearer, and optimized for use in the browser. This will help you quickly get the hang of the new modules.
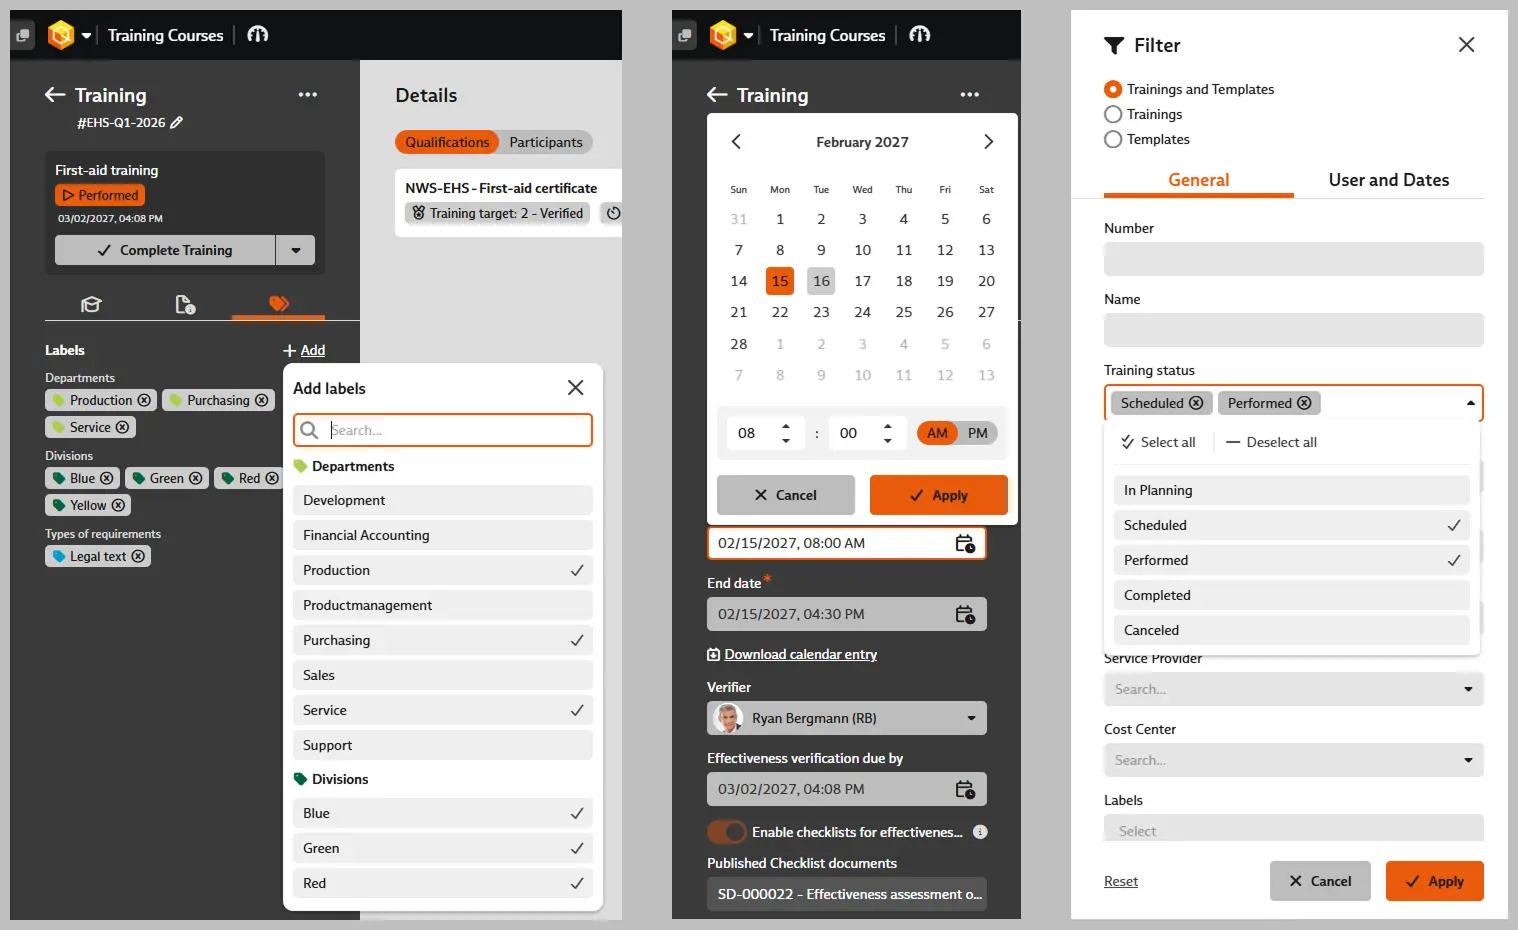
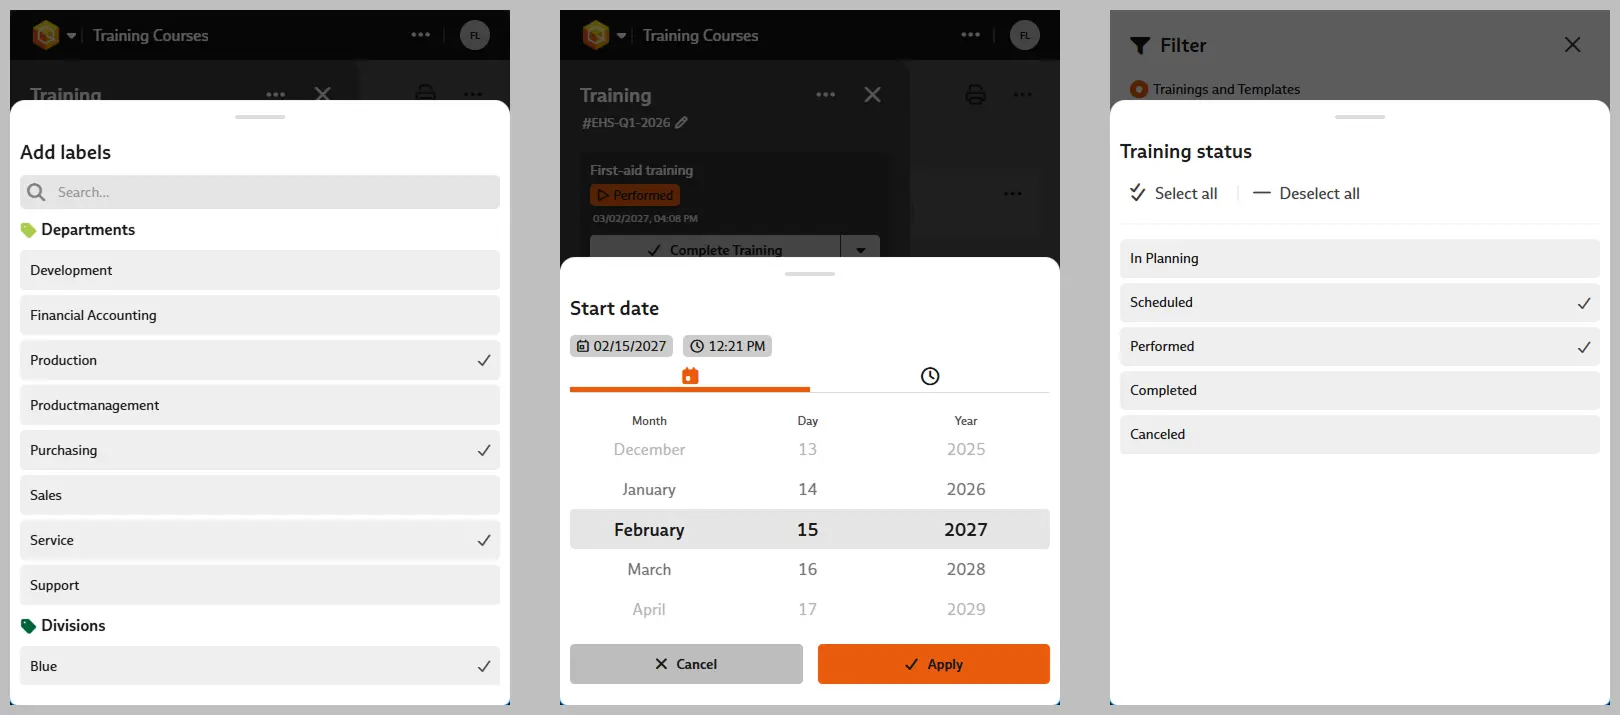
For Release 8.4, we have once again improved the user experience of BabtecQ Go. This time, we focused on the input fields where you make a selection, specifically the selection of:
- one or more entries from a catalog, such as labels
- one or more entries from a list provided by the system, e.g., status filter
- Date and Time
These fields can now be used consistently throughout BabtecQ Go – and not just on the desktop. Simultaneously, we are optimizing the user experience for mobile devices, as smartphones and tablets require different interaction patterns than desktop devices.
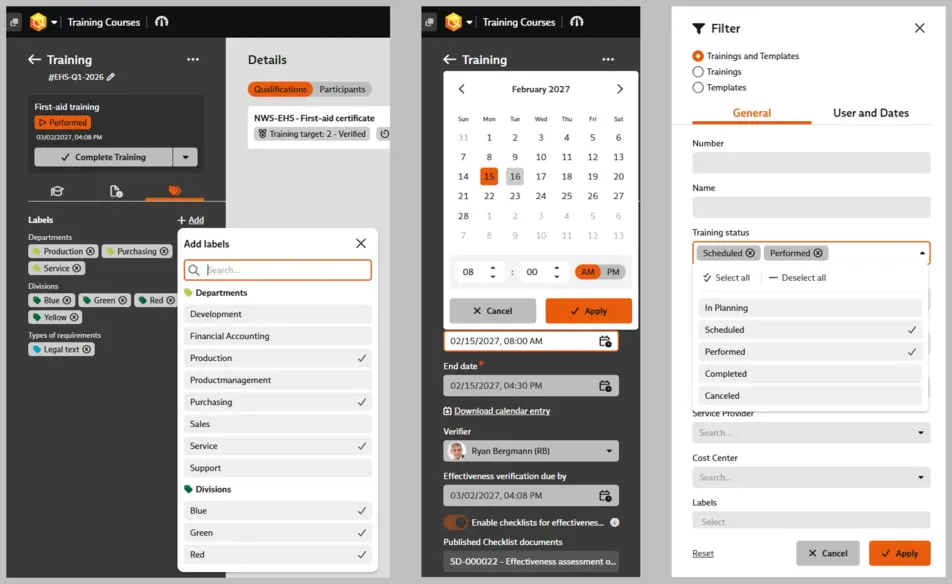
Examples of selection fields in BabtecQ Go on the desktop
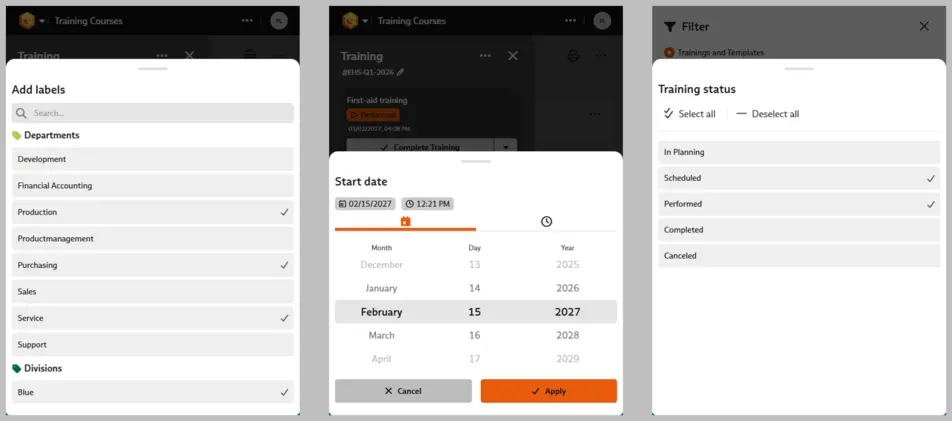
Examples of selection fields in BabtecQ Go on mobile devices
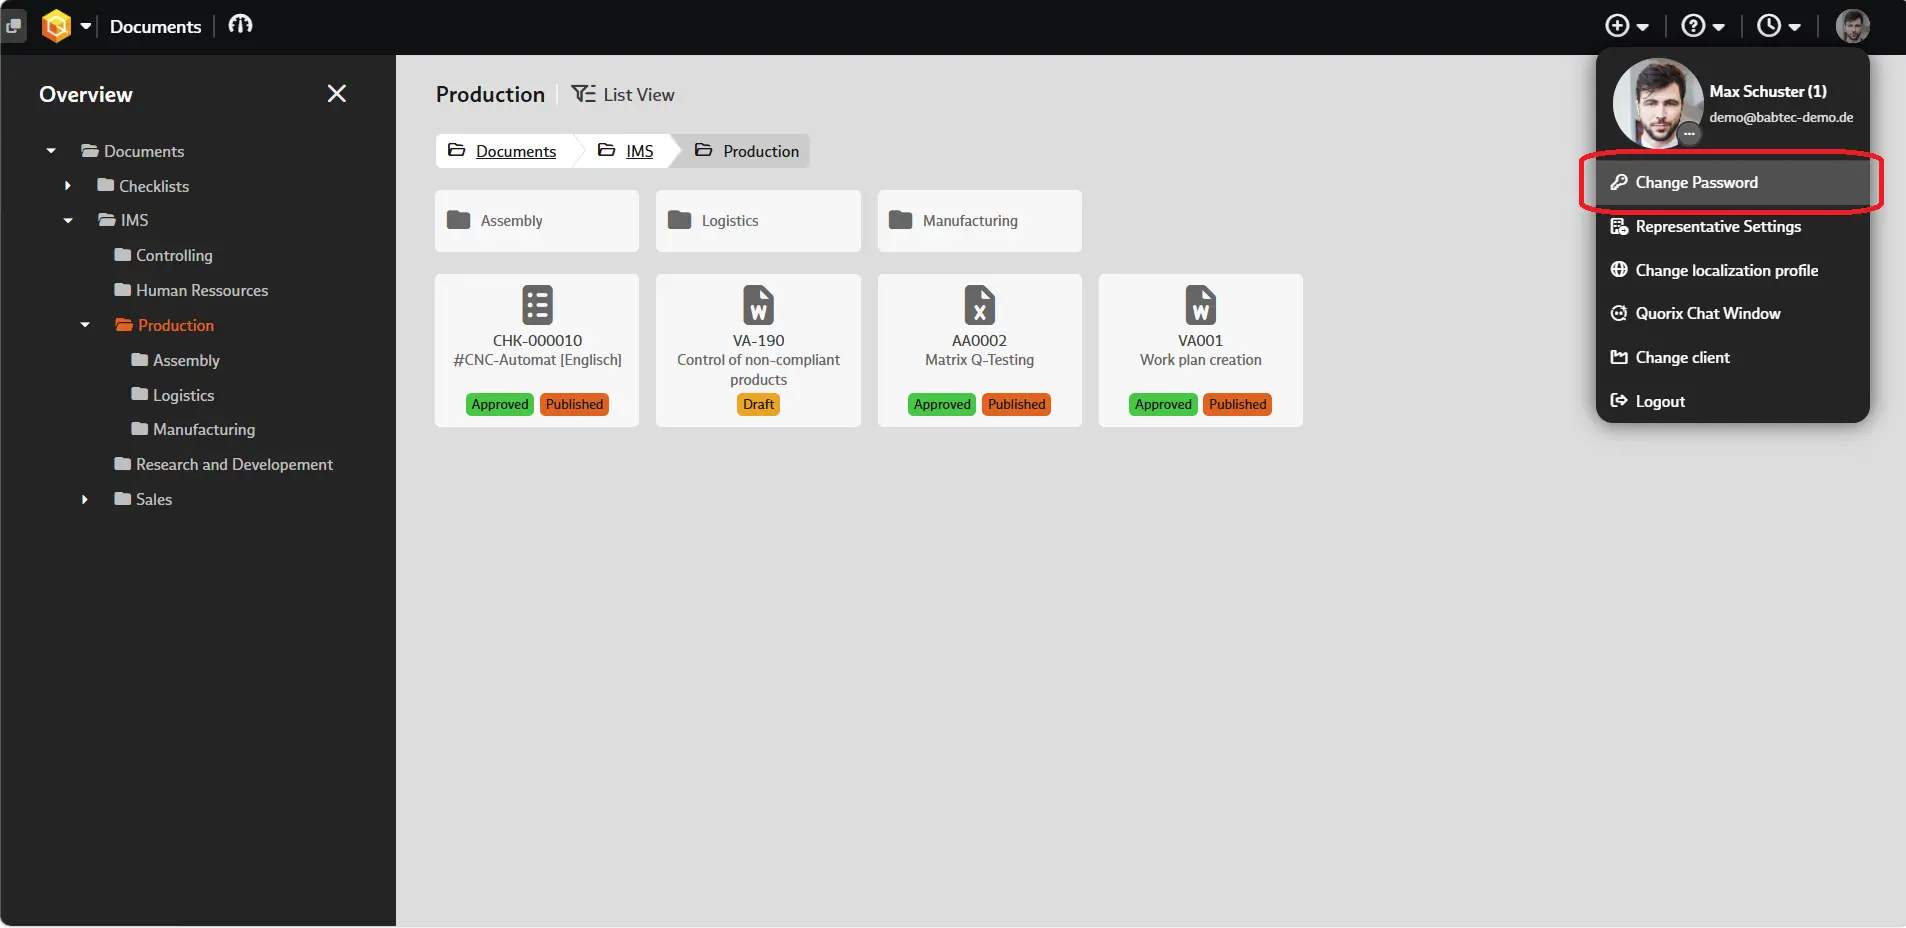
Every user can now change their own password in BabtecQ Go as needed. The option to do so can be found in the Account Manager.
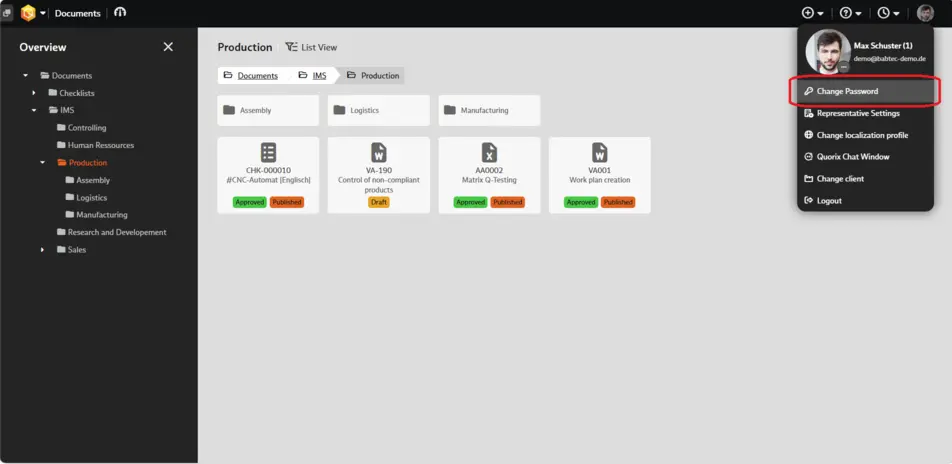
Account Manager in BabtecQ Go
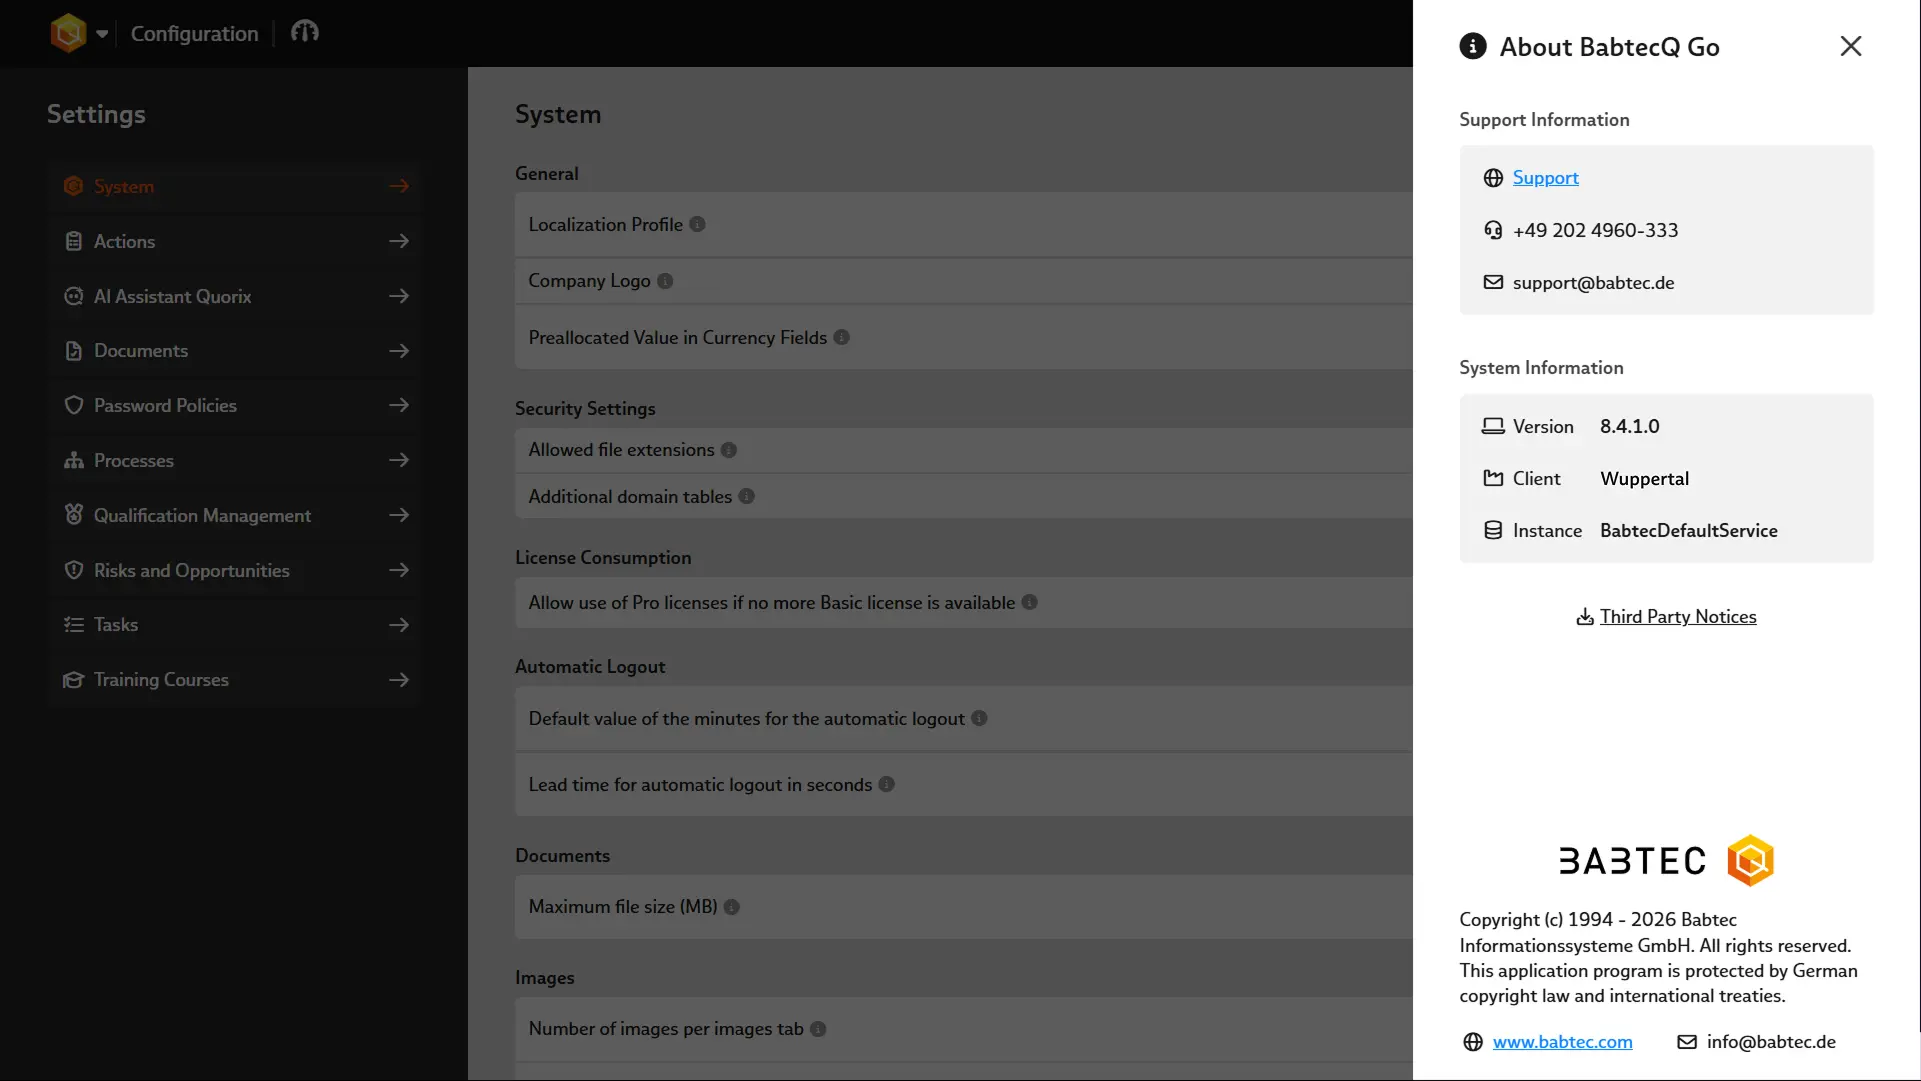
The Info dialog, which can be accessed at any time via the “Help” menu item and the “About BabtecQ Go” subitem, has been restructured. It now consolidates all important information about the system, as well as contact options for support, in one central location. The system information now includes the current version, the client being used, and the instance in use.
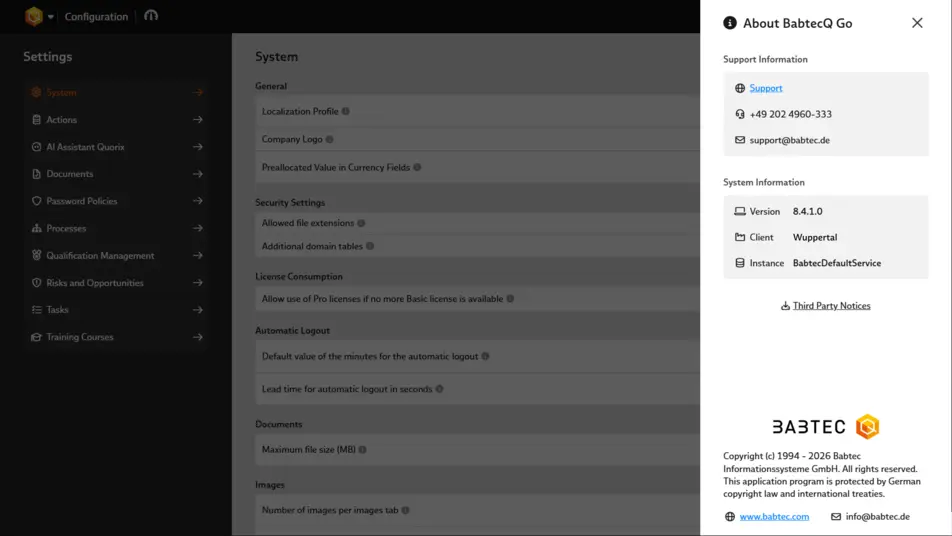
Redesigned dialog "About BabtecQ Go"
When opening a grouped list view, only the groupings are displayed, as before. At this point, no data has been loaded yet – "only" the number of records returned by the set filter has been determined. This is now also reflected in the message “0 of y items have been loaded.” Data is loaded only when a group is expanded, and only then is the number of currently loaded records displayed.
The "Expand All Groups" function is now always active. When the function is executed, all visible groups are expanded and the corresponding data returned by the set filter is loaded (this is equivalent to the "Load All" function).
Documents
When downloading documents, the file name is automatically assigned in the format “Document Number – Name.” In addition, the file name includes the current version of the document. This change applies to both the PDF preview and the original files and affects the “Documents” and “My Documents” modules.
File names no longer need to be manually adjusted after downloading. Thanks to the document number and version, the files remain uniquely identifiable even when stored locally and can be quickly identified.
PPAP
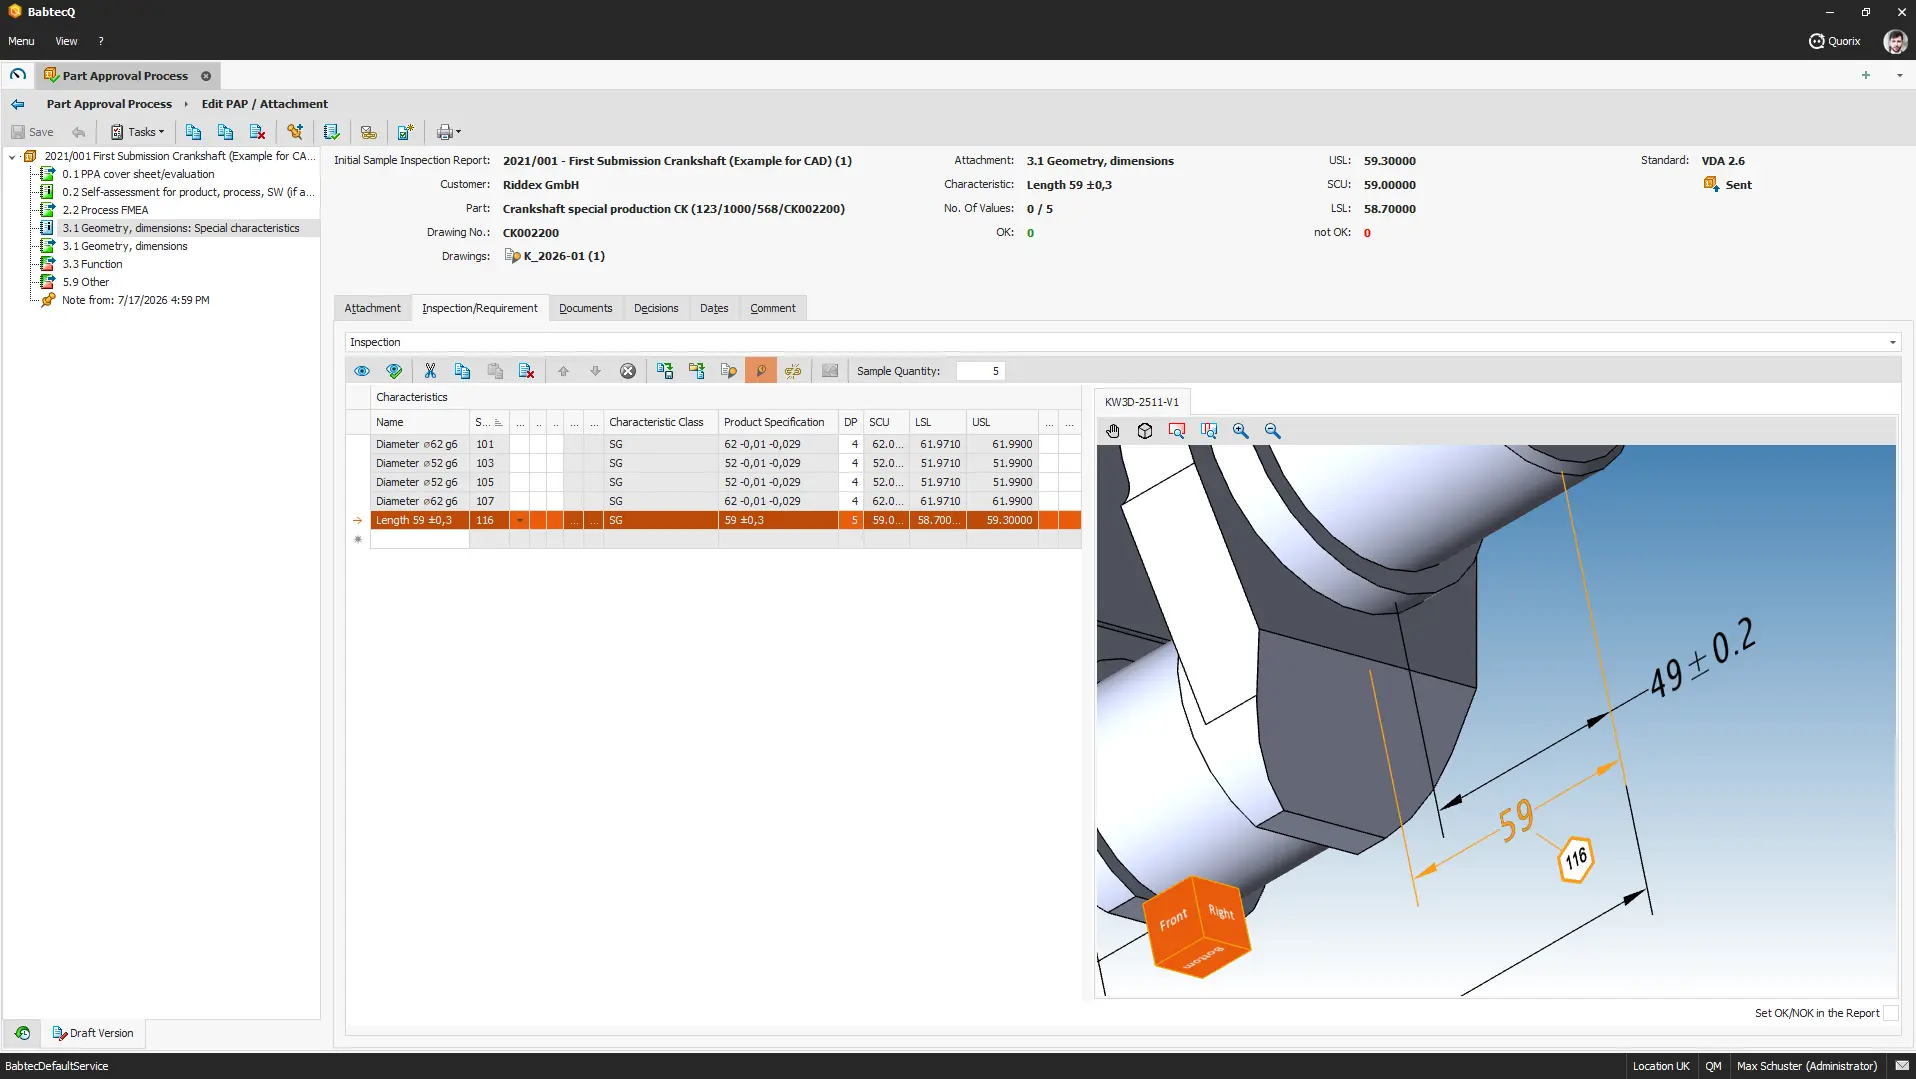
When you import characteristics from the “Drawings” module using the Import Wizard, the stamps are now also displayed directly on the 3D model in the CAD Viewer, each with its unique stamp number. This allows you to identify the relevant dimensions at a glance – just as you’re accustomed to with 2D drawings – and select them specifically.
During the part approval process, you can view the imported characteristics interactively in the CAD viewer at any time. Here, too, the displayed stamps quickly provide the necessary overview of the 3D model.
A note: A prerequisite for this is that the characteristics have a link to the drawing folder in the "Drawings" module.
Additional information: 3D CAD models contain stamp symbols
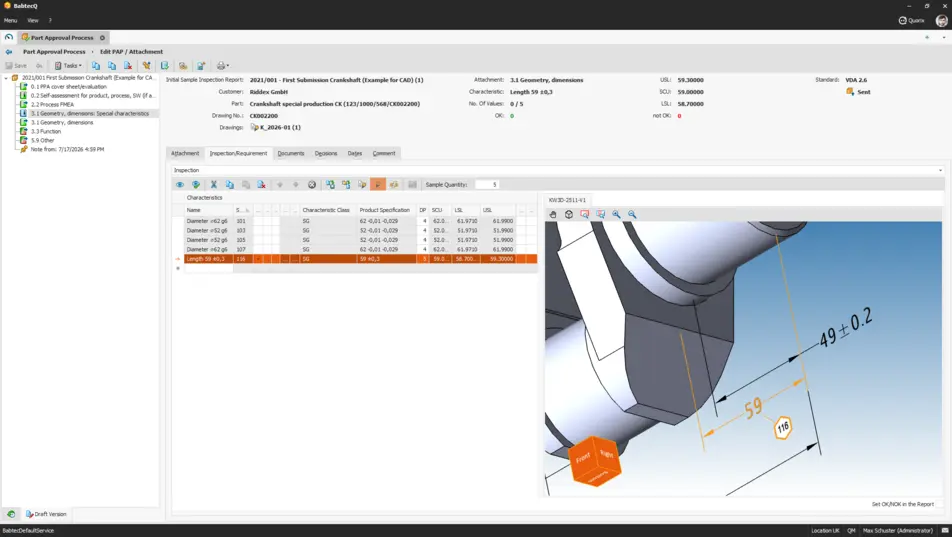
Interactive use of the 3D model with stamps within the scope of initial sampling
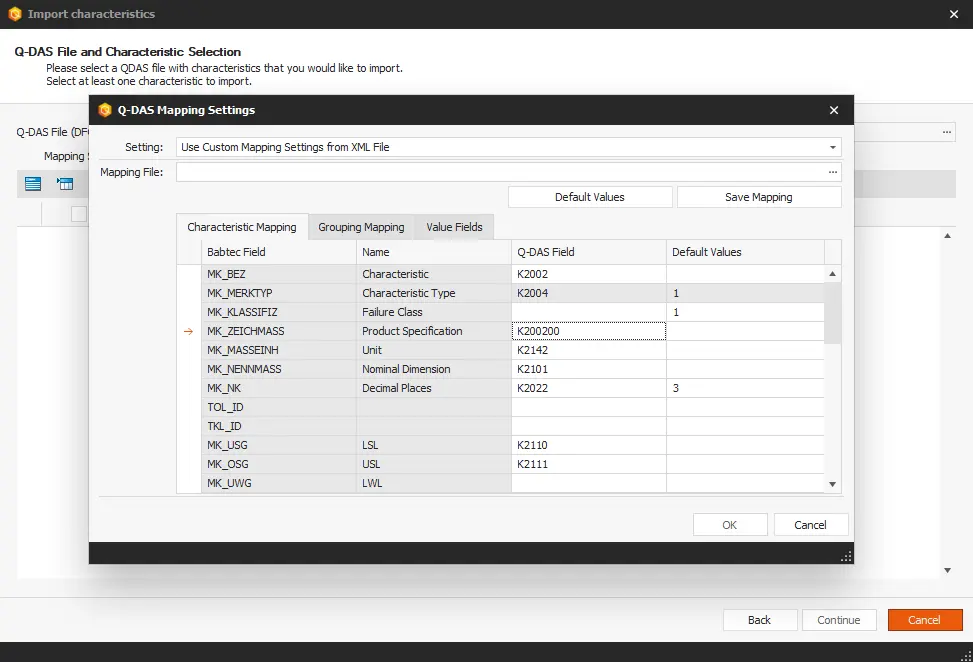
If, as part of the part approval process, both the characteristics and the test results are imported from a provided Q-DAS file (typically from a measuring machine) to create the initial sample inspection report (ISIR), the “Drawing Dimension” field had to be manually updated for each imported characteristic – because the standardized AQDEF exchange format does not define an explicit K-field that could be used to populate the “Drawing Dimension” field in the Babtec software accordingly.
To avoid having to update the data later in this use case, the drawing dimension is now composed of the K-fields K2101, K2113, and K2112[1] and stored in a newly defined K-field "K200200" for import into the Babtec software[2]. In the default mapping settings for importing a Q-DAS file, the new K-field “K200200” is now assigned to the Babtec field “Drawing Dimension”, so that the composite drawing dimension is now imported as well.
[1] with K2101 = nominal dimension, K2113 = upper deviation (incl. sign) and K2112 = lower deviation (incl. sign)
[2] K200200 is a field defined by Babtec that is not part of AQDEF
A note: Typically, during the part approval process, the required characteristics for the ISIR are derived from the “stamped” drawing dimensions (in the “Drawings” module) using CAD integration, and the “Drawing Dimension” field is automatically populated.
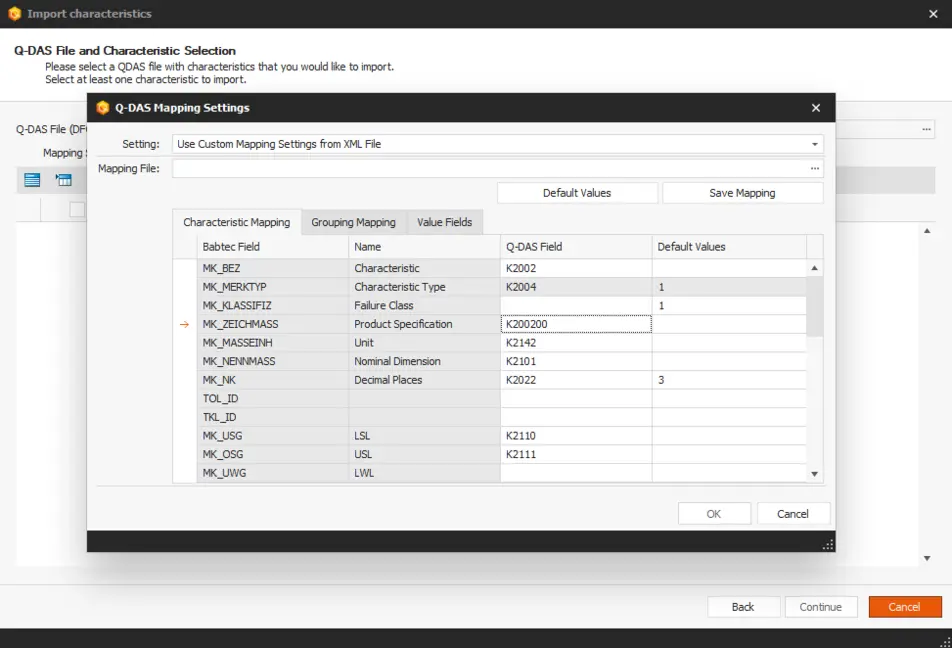
Mapping settings for importing characteristics from a Q-DAS file – now with 'drawing dimension'
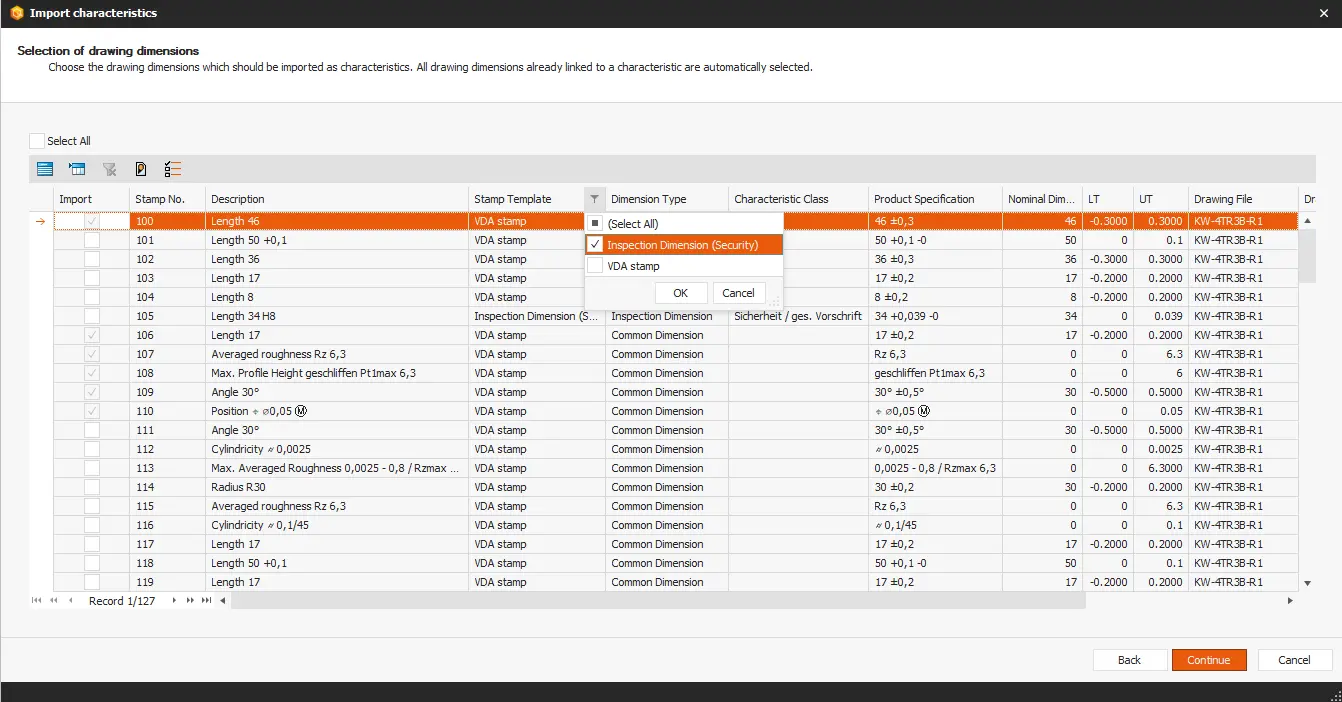
When importing characteristics from the “Drawings” module, additional options are now available in the drawing dimension selection list – namely, stamp template, dimension type, tolerance table, and remark. This additional information makes it easier to identify and specifically select the relevant dimensions – for example, to distinguish rough dimensions from standard dimensions.
In addition, the standard functions familiar from other lists – such as sorting, showing and hiding columns, and automatic column width – are also available for all columns in this list view.
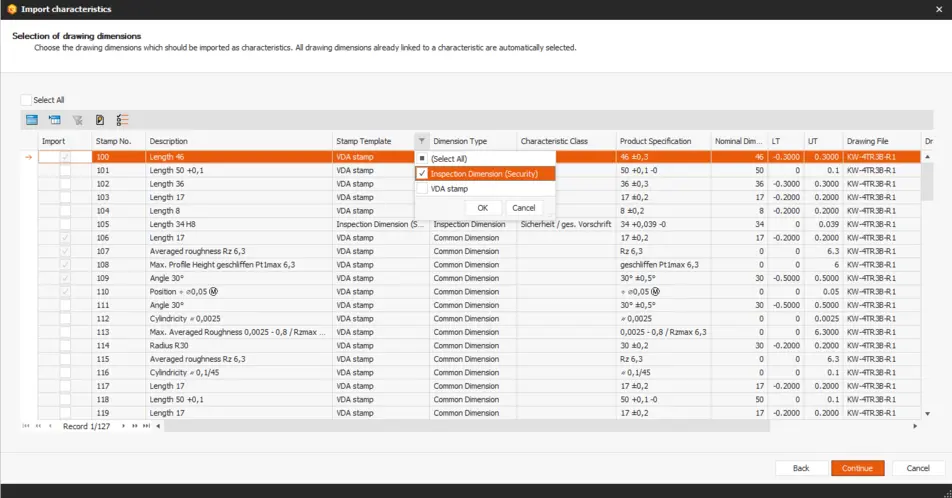
Import assistant for features – here the selection list with drawing dimensions from the "Drawings" module
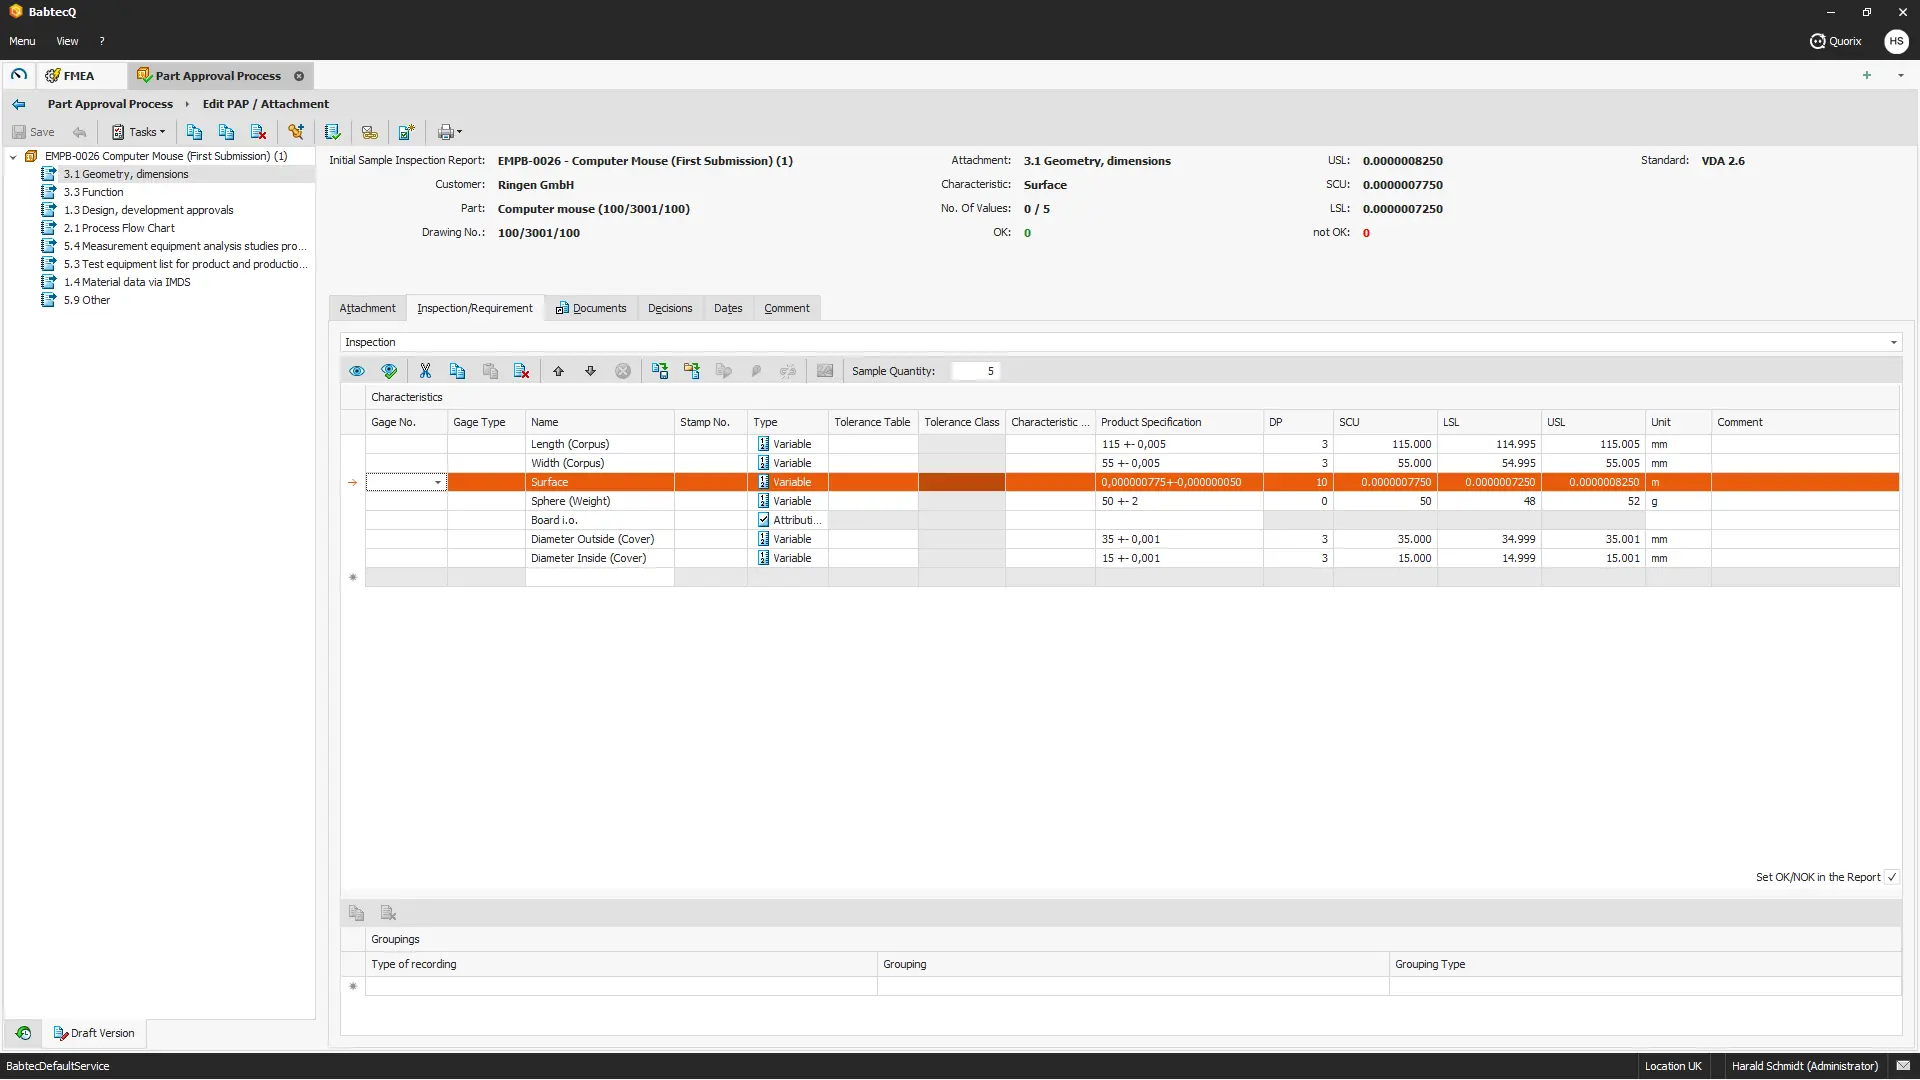
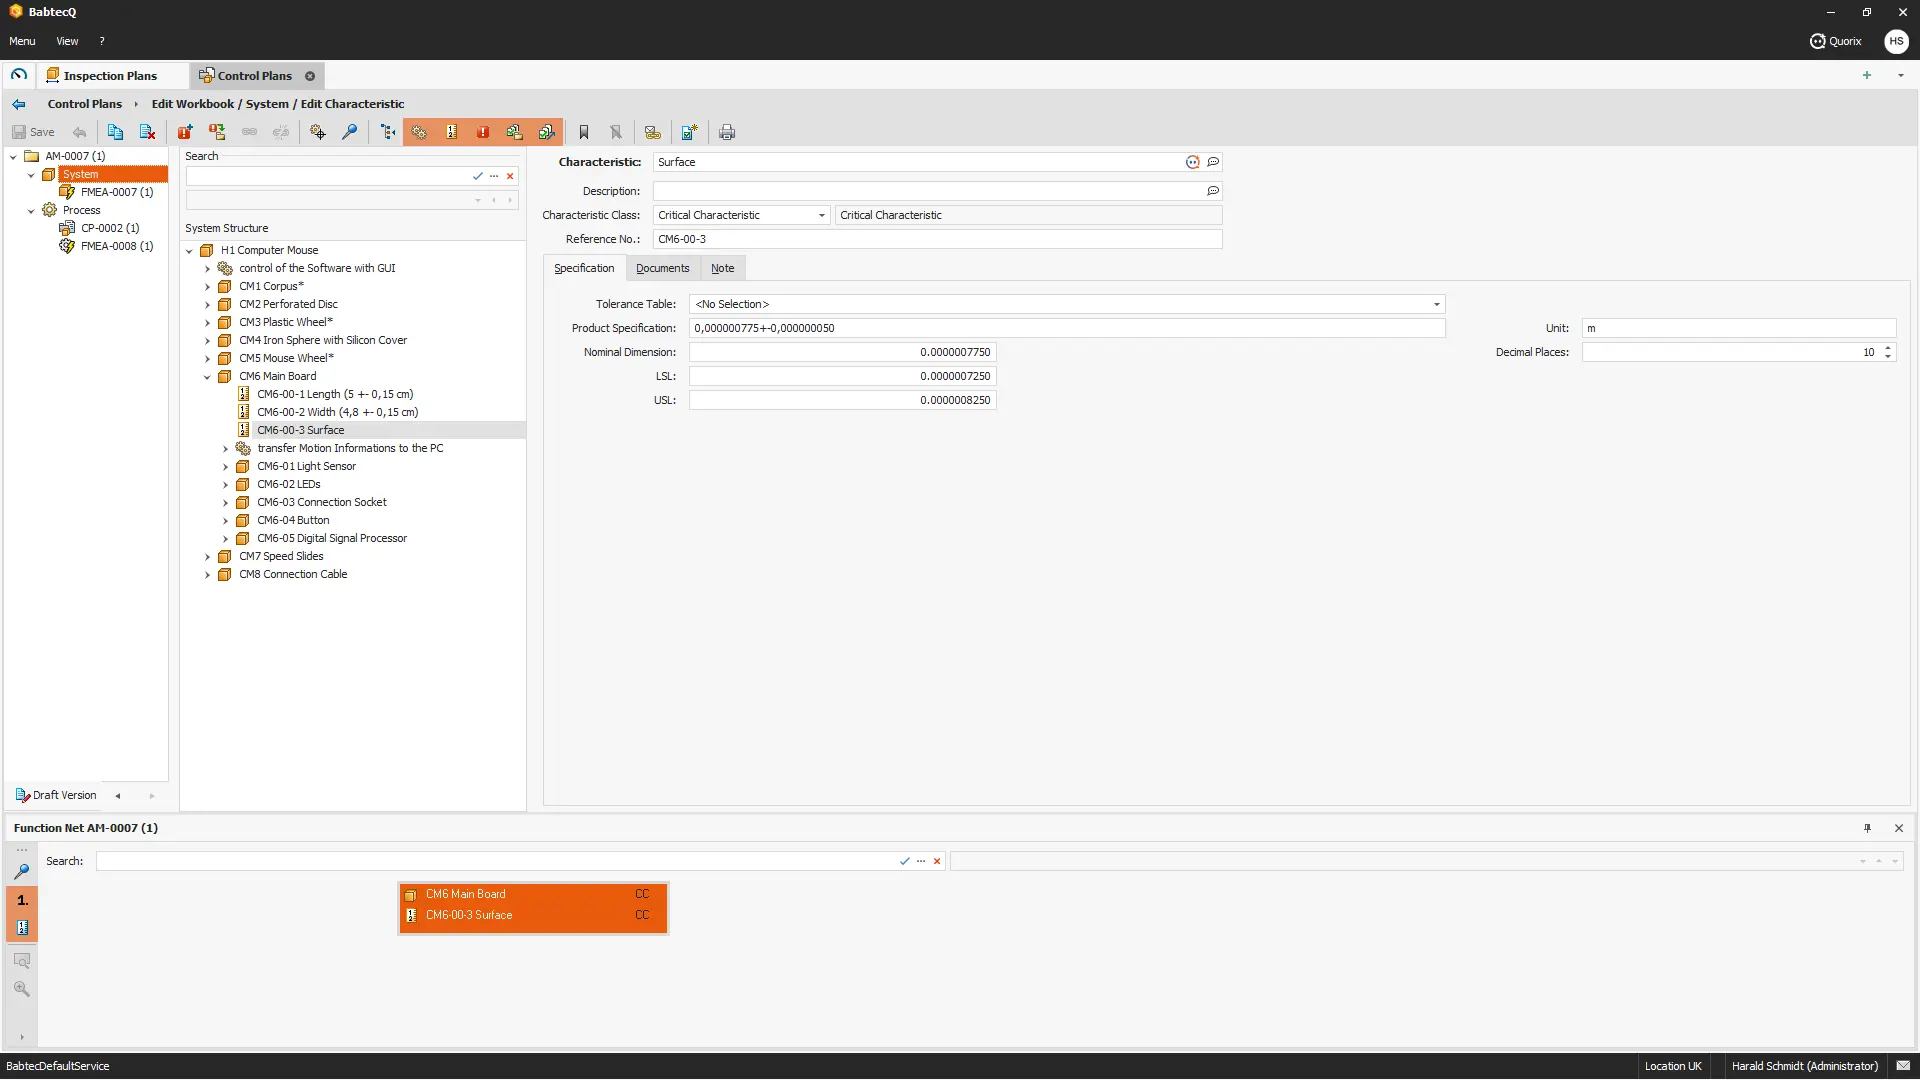
For variable characteristics, the specification limit for the nominal dimension and the upper and lower specification limits was previously limited to a maximum of 6 digits before the decimal place and 4 decimal places after the decimal place.
In the modules for part approval processes, inspection plans, FMEA, and control plans, you can now specify up to 10 decimal places before the decimal point or 10 decimal places after the decimal point for the nominal value and limits of the characteristics, for a total of no more than 12 digits.
This allows you to accurately measure even very small values, such as leak rates of 10⁻⁹ mbar·l/s from residual gas analysis, surface measurements in the µm and nm ranges, or measurements in inches that are not typically converted to smaller units. Similarly, large values can be displayed, such as particle counts in the millions, insulation resistances up to 10⁹ MΩ, or eight-digit codes during barcode verification on components.
Data from Q-DAS files containing many decimal places is now imported in full. This allows you to import your measurement values regardless of the manufacturer, without rounding and without having to adjust the settings on the measuring device.
A note: In the "Drawings" module, the number of decimal places has been increased to 6 only for length measurements.
For MSA (measurement system analysis), the maximum number of decimal places remains at 5 before the decimal point and 10 after the decimal point.
For tolerance tables, the previous limit of 6 digits before the decimal point and 4 decimal places continues to apply.
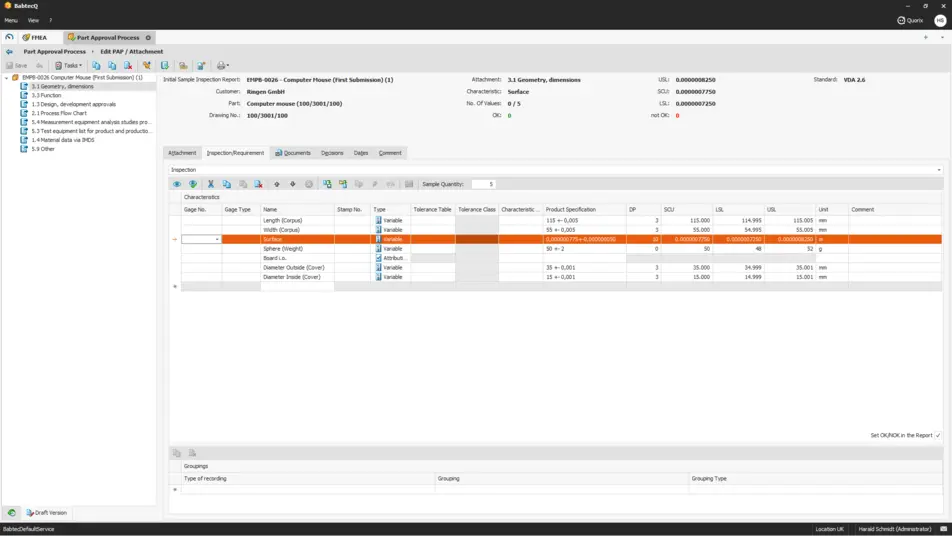
Specified characteristics for an initial sample inspection report (ISIR)
FMEA / Control Plans
In the “Link/Update Base Workbook” wizard, the list of available base workbooks now includes additional columns showing the number and name of the Design FMEA, Process FMEA, and/or control plan contained within each workbook. This allows you to find the right base workbook more quickly and reliably.
When using the “Link/ Update" wizard in an open workbook, the usual loading indicator now appears while the Babtec software is still processing data – for example, when selecting a base workbook, when executing "Apply Changes to Workbook“, or when changing the workbook version. This helps avoid confusion, as you can always tell that a process is still running – which can take a little longer than usual, especially with large workbooks containing many changes.
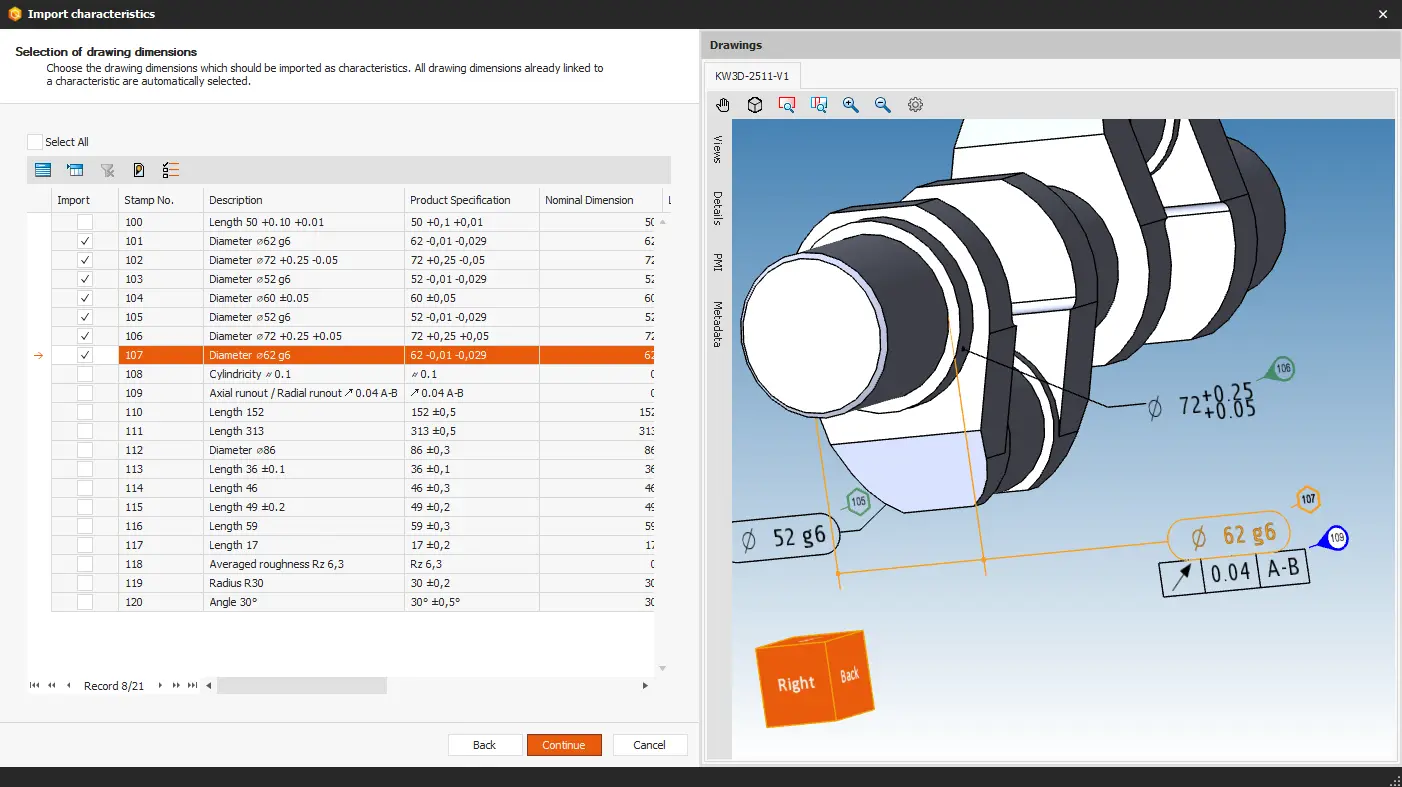
When you import characteristics from the “Drawings” module using the Import Wizard, the stamps are now also displayed directly on the 3D model in the CAD Viewer, each with its unique stamp number. This allows you to identify the relevant dimensions at a glance – just as you’re accustomed to with 2D drawings – and select them specifically.
In the system or process structure of a workbook, you can view the imported characteristics interactively in the CAD viewer at any time. Here, too, the displayed stamps quickly provide the necessary overview of the 3D model.
A note: A prerequisite for this is that the characteristics have a link to the drawing folder in the "Drawings" module.
Additional information: 3D CAD models contain stamp symbols
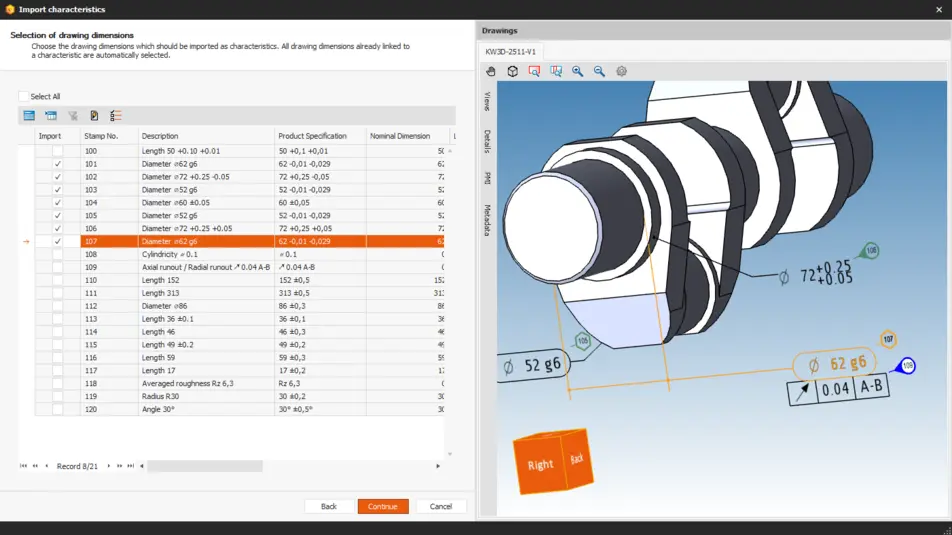
In the import assistant for features, the 3D model supports the selection of relevant product features
When using the function calls in the system and/or process structure to import elements from other workbooks (e.g., a subprocess or an action pack), the system now ensures that only workbooks and their contents for which the logged-in user has at least read access are visible.
If the logged-in user does not have either the "Read access to all workbooks" permission or the "Apply permissions for own workbooks to other users' workbooks" permission, then only those workbooks and their contents in which
- this user is part of the team,
- the workbook was created by this user,
- the user is designated as the person responsible for the control plan, or
- the user is designated as the user's representative.
A note: The visibility of base workbooks is not restricted in connection with these permissions.
When importing characteristics from the “Drawings” module, additional options are now available in the drawing dimension selection list – namely, stamp template, dimension type, tolerance table, and remark. This additional information makes it easier to identify and specifically select the relevant dimensions – for example, to distinguish rough dimensions from standard dimensions.
In addition, the standard functions familiar from other lists – such as sorting, showing and hiding columns, and automatic column width – are also available for all columns in this list view.
Import assistant for features – here the selection list with drawing dimensions from the "Drawings" module
For product and process characteristics, the specification limit for nominal dimensions and upper and lower specification limits was previously limited to a maximum of 6 decimal places before the decimal point and 4 decimal places after the decimal point.
In the modules for part approval processes, inspection plans, FMEA, and control plans, you can now specify up to 10 decimal places before the decimal point or 10 decimal places after the decimal point for the nominal value and limits of characteristics, for a total of no more than 12 digits.
This allows you to accurately measure even very small values, such as leak rates of 10⁻⁹ mbar·l/s from residual gas analysis, surface measurements in the µm and nm ranges, or measurements in inches that are not typically converted to smaller units. Similarly, large values can be displayed, such as particle counts in the millions, insulation resistances up to 10⁹ MΩ, or eight-digit codes during barcode verification on components.
A note: In the "Drawings" module, the number of decimal places has been increased to 6 only for length measurements.
For MSA (measurement system analysis), the maximum number of decimal places remains at 5 before the decimal point and 10 after the decimal point.
For tolerance tables, the previous limit of 6 digits before the decimal point and 4 decimal places continues to apply.
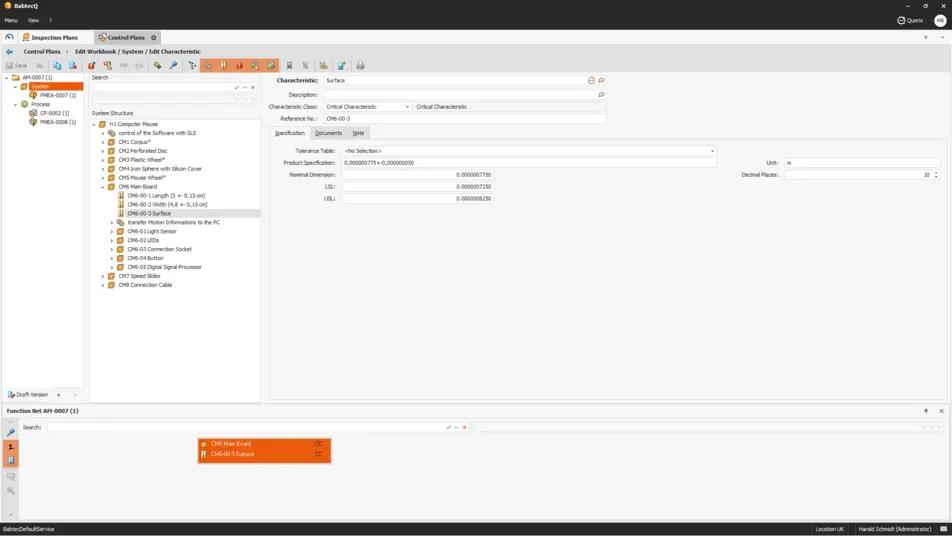
Specified product feature in a workbook for a Process FMEA and the Control Plan
MSA
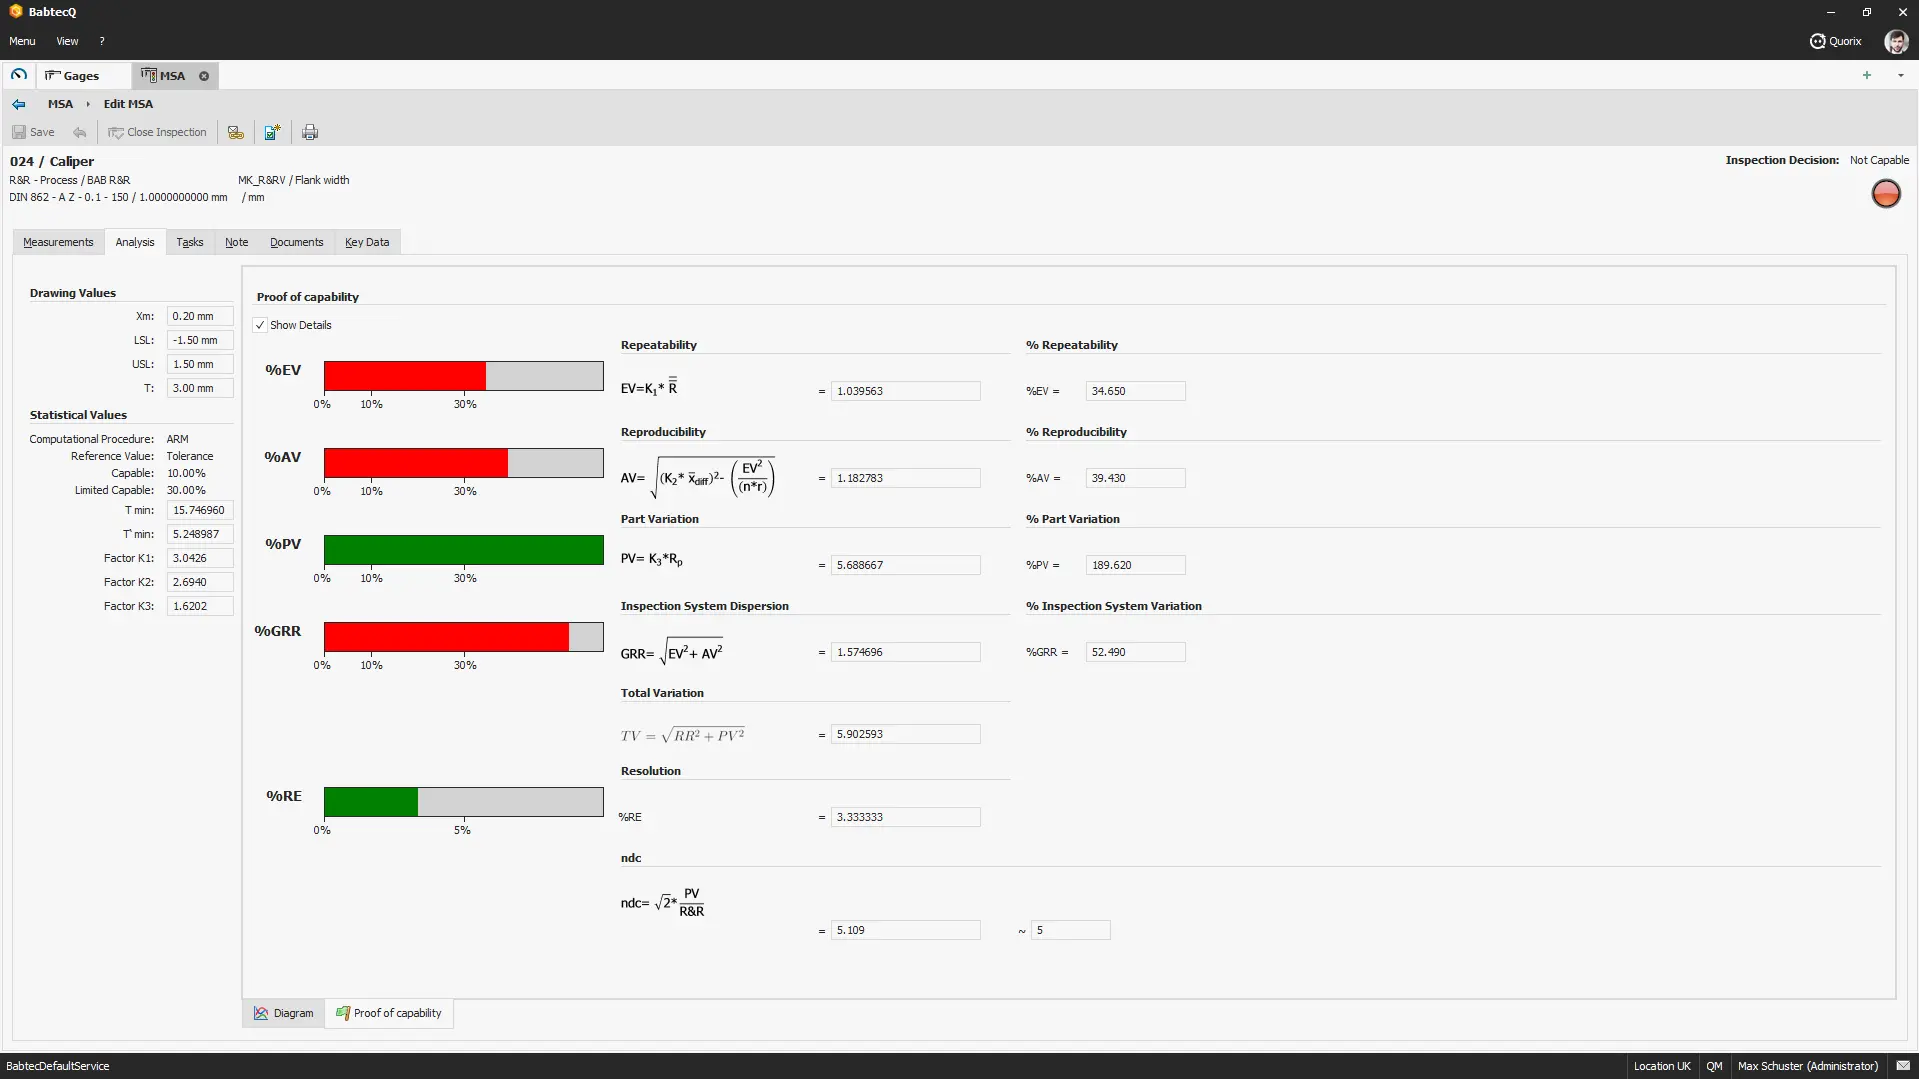
The color logic for %PV is the inverse of the previous generic percentage rating logic. A high PV value is now displayed in green, and a low PV value in red.
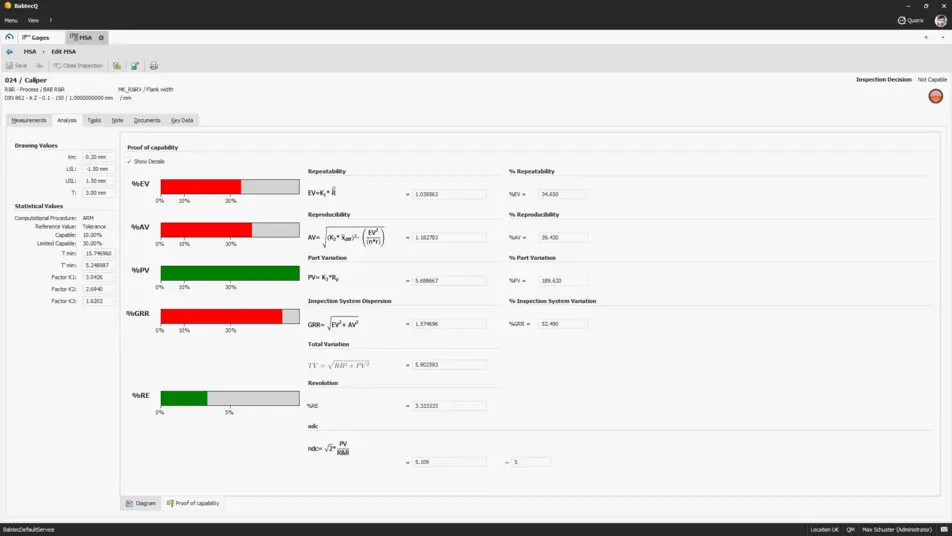
Example of evaluation for MSA based on an R&R procedure
Processes
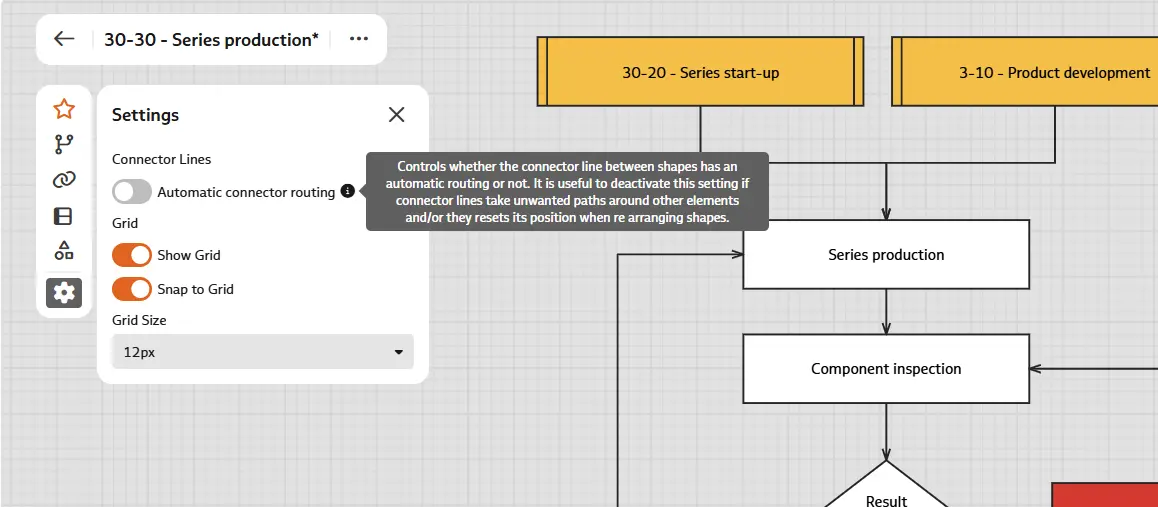
By default, the automatic drawing of connection lines between shapes in the flowchart is enabled. This setting can now be disabled if necessary. This helps prevent unwanted (automatically updated) line paths, especially when using swim lanes.
The setting can be configured on a per-flowchart basis or globally preassigned in the "Configuration" module.
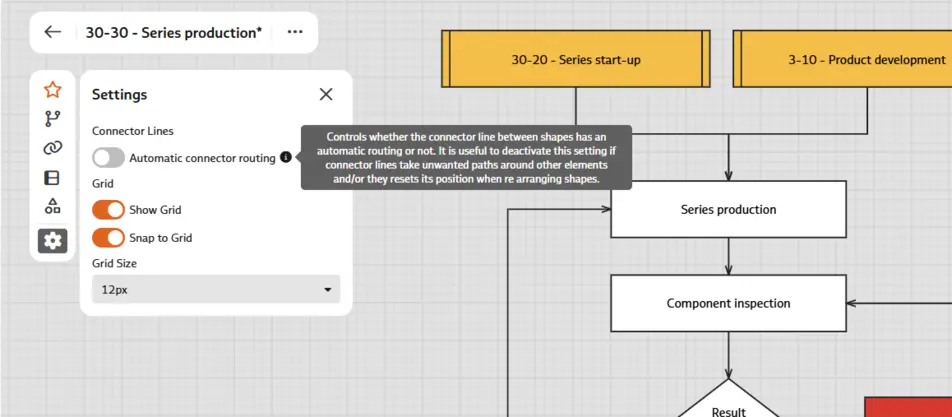
Flowchart (excerpt) – Settings with disabled automatic connector line routing
Inspection Plans
When you import inspection characteristics from the “Drawings” module using the Import Wizard, the stamps are now also displayed directly on the 3D model in the CAD Viewer, each with its unique stamp number. This allows you to identify the relevant dimensions at a glance – just as you’re accustomed to with 2D drawings – and select them specifically.
In the inspection plan and also during the inspection, you can view the imported inspection characteristics interactively in the CAD viewer at any time. Here, too, the displayed stamps quickly provide the necessary overview of the 3D model.
A note: This requires that the inspection characteristics be linked to the drawing folder in the “Drawings” module.
Additional information: 3D CAD models contain stamp symbols
In the import assistant for features, the 3D model supports the selection of relevant inspection characteristics
When importing the relevant inspection characteristics from a provided Q-DAS file (typically from a measuring machine) as part of inspection planning, the “Drawing Dimension” field had to be manually updated for each imported characteristic in the inspection plan – because the standardized AQDEF exchange format does not define an explicit K-field that could be used to populate the “Drawing Dimension” field in the Babtec software accordingly.
To avoid having to update the data later in this use case, the drawing dimension is now composed of the K fields K2101, K2113, and K2112[1] and stored in a newly defined K-field "K200200" for import into the Babtec software[2]. In the default mapping settings for importing a Q-DAS file, the new K-field “K200200” is now assigned to the Babtec field “Drawing Dimension”, so that the combined drawing dimension is now imported as well.
[1] with K2101 = nominal dimension, K2113 = upper deviation (incl. sign) and K2112 = lower deviation (incl. sign)
[2] K200200 is a field defined by Babtec that is not part of AQDEF
A note: Typically, as part of inspection planning, the required characteristics are derived from the “stamped” drawing dimensions (in the “Drawings” module) using CAD integration, and the “Drawing Dimension” field is automatically populated.
Mapping settings for importing characteristics from a Q-DAS file – now with "Drawing Dimension"
When importing characteristics from the “Drawings” module, additional options are now available in the drawing dimension selection list – namely, stamp template, dimension type, tolerance table, and remark. This additional information makes it easier to identify and specifically select the relevant dimensions – for example, to distinguish rough dimensions from standard dimensions.
In addition, the standard functions familiar from other lists – such as sorting, showing and hiding columns, and automatic column width – are also available for all columns in this list view.
Import assistant for features – here the selection list with drawing dimensions from the "Drawings" module
For variable inspection characteristics, the specification of the nominal dimension and the upper and lower specification limits was previously limited to a maximum of 6 digits before the decimal place and 4 decimal places after the decimal place.
In the modules for part approval processes, inspection plans, FMEA, and control plans, you can now specify up to 10 decimal places before the decimal point or 10 decimal places after the decimal point for the nominal value and limits of characteristics, for a total of no more than 12 digits.
This allows you to accurately measure even very small values, such as leak rates of 10⁻⁹ mbar·l/s from residual gas analysis, surface measurements in the µm and nm ranges, or measurements in inches that are not typically converted to smaller units. Likewise, large values can be displayed, such as particle counts in the millions, insulation resistances up to 10⁹ MΩ, or eight-digit codes during barcode verification on components.
Data from Q-DAS files containing many decimal places is now imported in full. This allows you to import your measurement values regardless of the manufacturer, without rounding and without having to adjust the settings on the measuring device.
A note: In the "Drawings" module, the number of decimal places has been increased to 6 only for length measurements.
For MSA (measurement system analysis), the maximum number of decimal places remains at 5 before the decimal point and 10 after the decimal point.
For tolerance tables, the previous limit of 6 digits before the decimal point and 4 decimal places continues to apply.
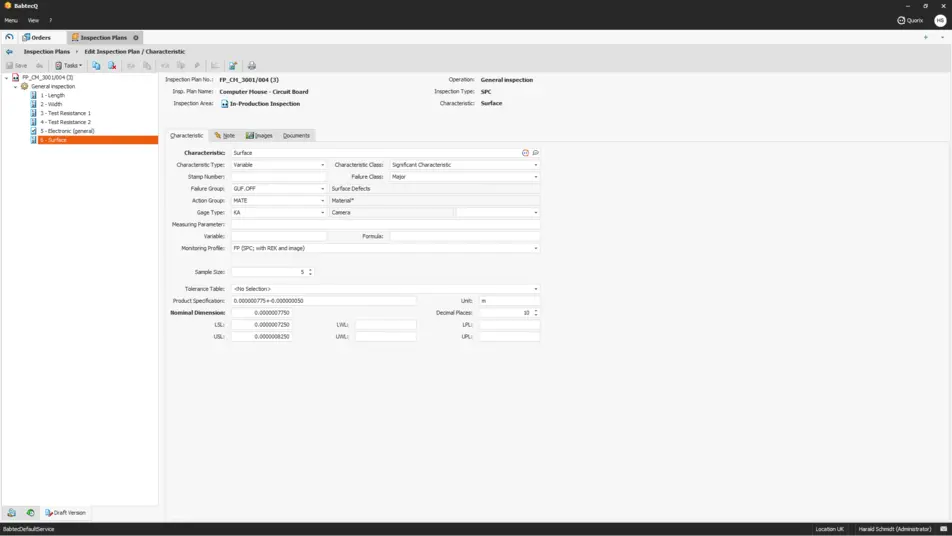
Specified inspection characteristic in an inspection plan
Inspection
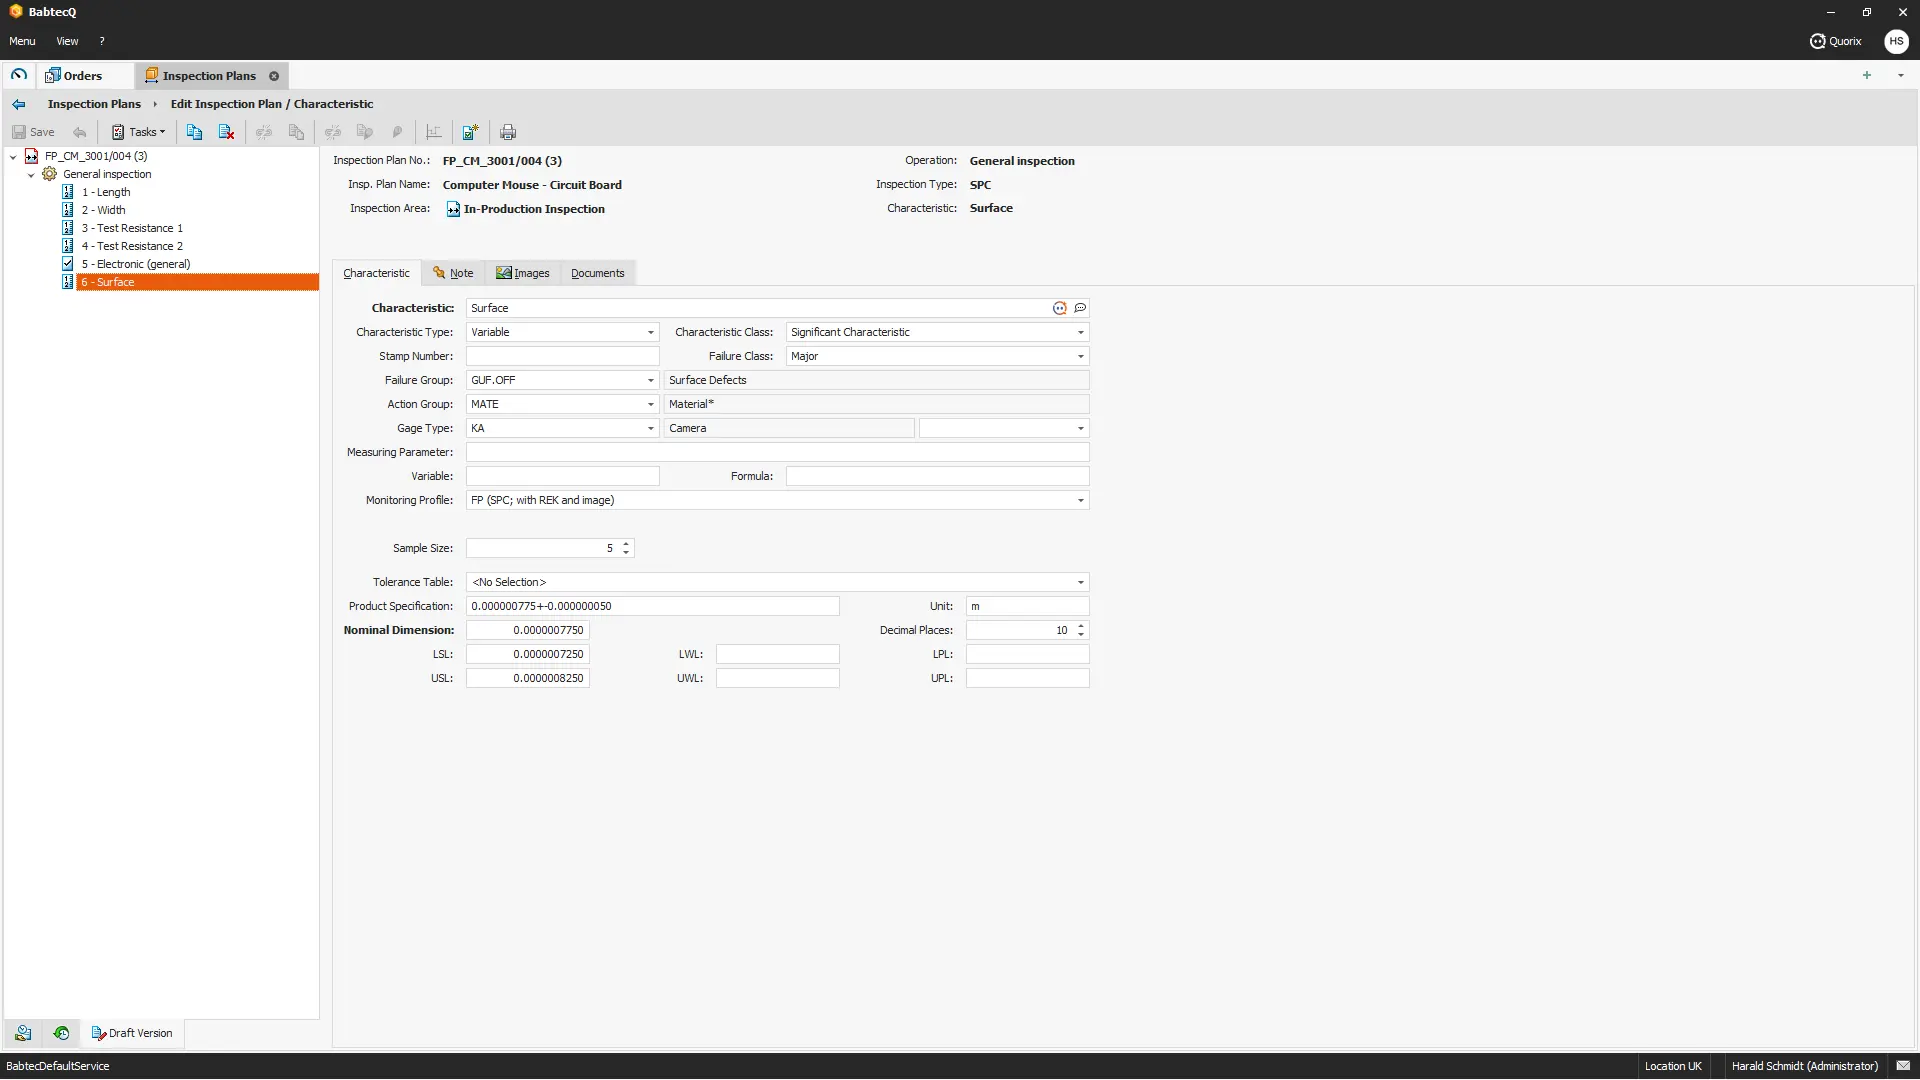
During the inspection, you can use the CAD viewer to display the inspection characteristic in the drawing or on the 3D model. In the new release, the stamp symbols with their unique stamp numbers are now also displayed directly on the 3D model, allowing you to quickly get a clear overview.
A note: This requires that the inspection characteristics have been imported from the "Drawings" module and are linked to the drawing folder.
Additional information: 3D CAD models contain stamp symbols
Quorix
Quorix is more than just a chatbot – it’s an agent integrated into the Babtec software that finds the best possible solution for every question. To do this, Quorix uses various specialized AI technologies from the Microsoft Azure Cloud.
Based on this, with Quorix (version 8.3 and later), we offer you a centralized solution for all your users –turnkey and ready to use right away. You don’t have to worry about infrastructure, administration, or subscriptions. You decide who is allowed to use Quorix in their work environment – whether they’re experienced with AI or just looking for an easy introduction to the world of AI. We’ll take care of the rest.
Quorix initially launched with features that every user can benefit from – regardless of which module they use on a daily basis.
A note: For more information, see the release notes for the previous version, 8.3.
In the new 8.4 release, Quorix can do even more: The AI-powered support for complaint handling, which was tested in the beta program, is now ready for production use – and the detailed and valuable feedback from participants has been incorporated into its further development.
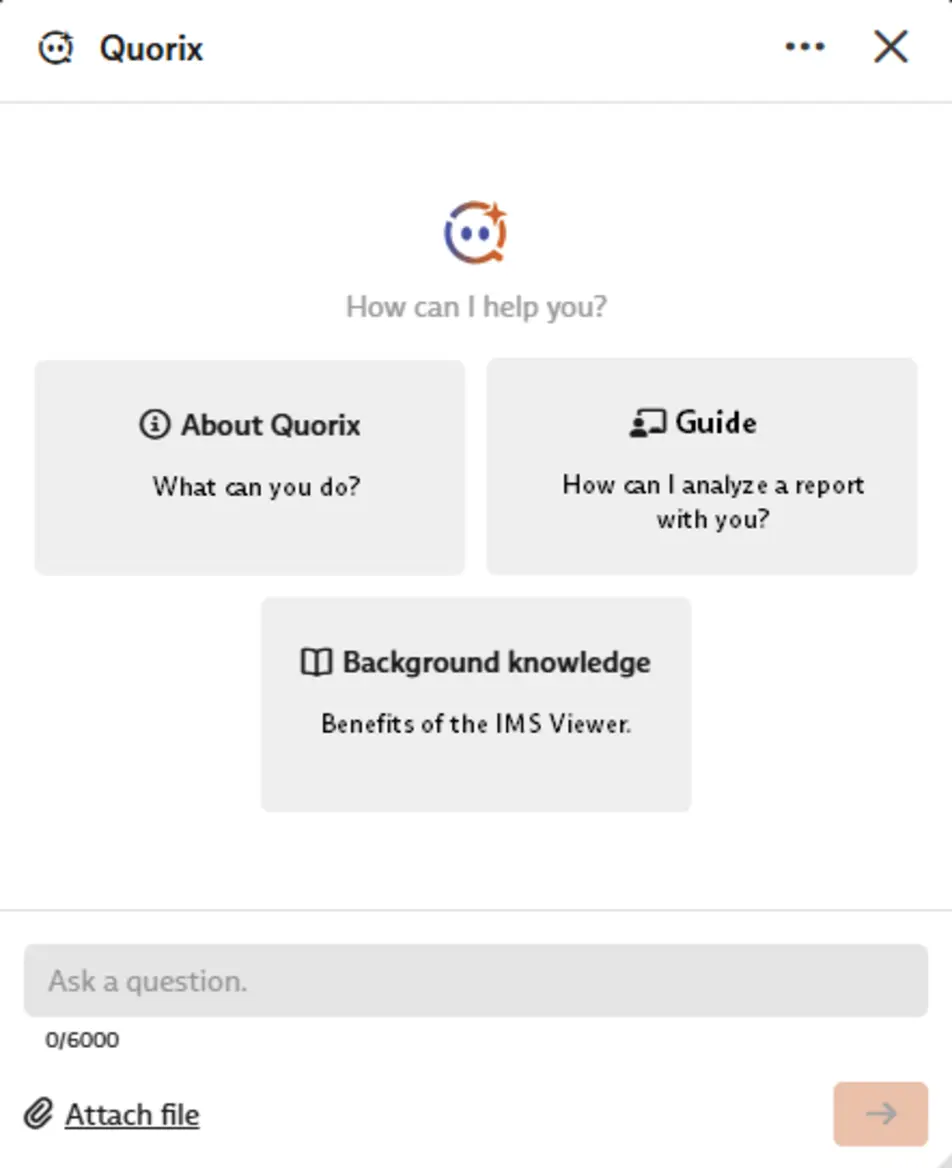
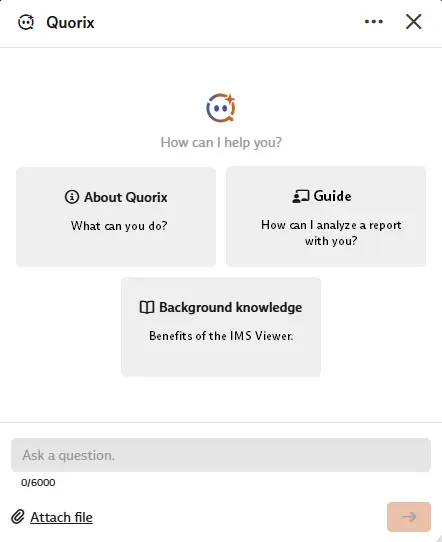
Chat with Quorix – in both the BabtecQ Windows client and the browser-based BabtecQ Go frontend
With this new release, our AI assistant now supports you throughout the entire complaint process:
- regarding the filing of new complaints
- On Root Cause Analysis
- to the appropriate actions.
Quorix speeds up your claims processing by eliminating time-consuming typing and searching. It also makes the process more thorough, as the AI highlights causes and actions that might otherwise be overlooked. And most importantly, you remain in control: All suggestions are initially non-binding – only what you’ve inspected, adjusted if necessary, and deliberately approved is saved. You retain full control. The more complete the complaint data is, the more accurate Quorix’s suggestions become.
Quorix takes routine tasks off your hands, provides well-founded recommendations, and gives you more time to focus on what really matters: the technical assessment and long-term resolution of quality issues.
A note: Please note that AI-generated content may contain errors or be incomplete. Therefore, always inspect the suggestions for accuracy before using them.
Additional Information: Complaints
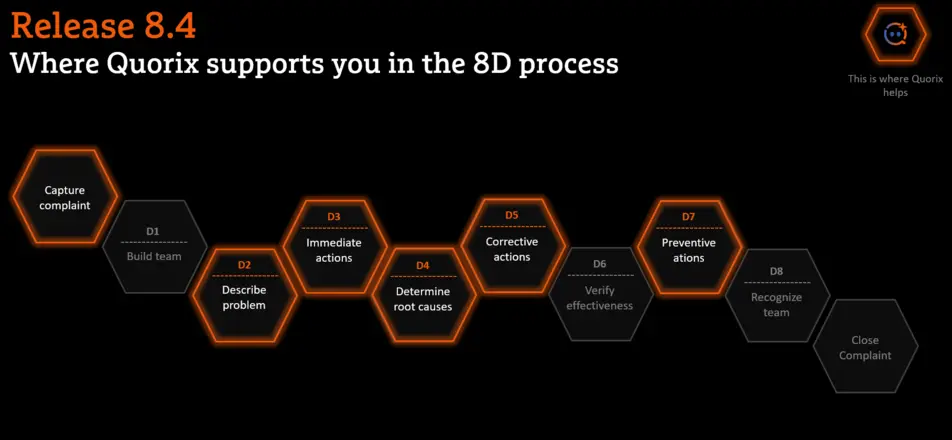
Here Quorix supports
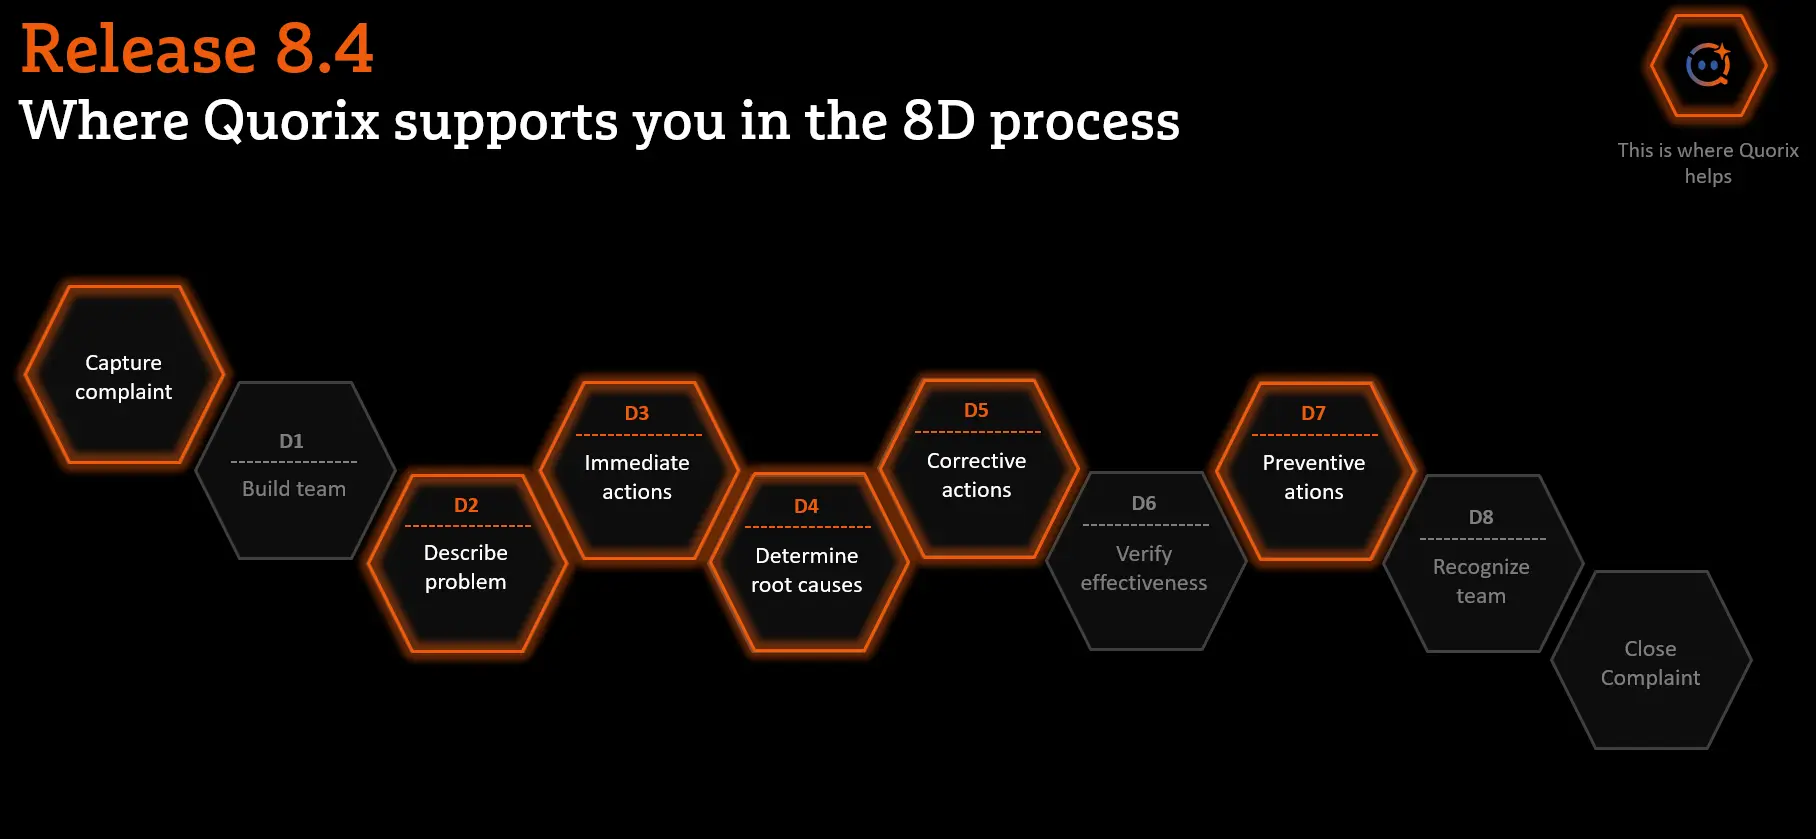
Complaints
The report layout has been revised so that text, labels, and their corresponding content are now uniformly aligned at the top and always start at the same height. This makes it immediately clear, even with longer text, which content belongs to which label.
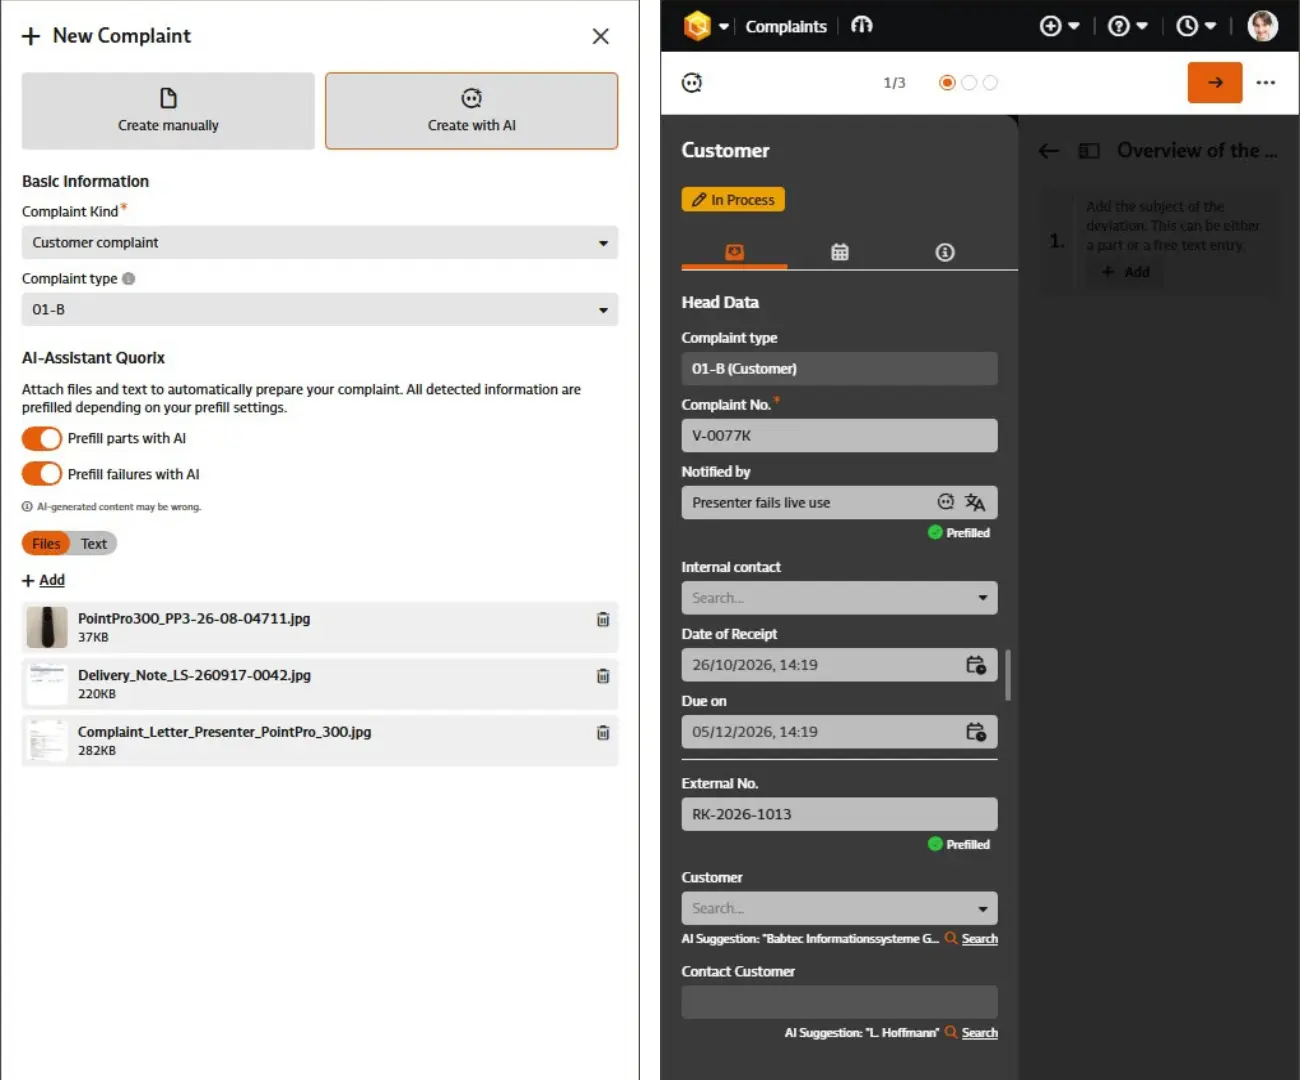
Is there a complaint letter on your desk? Instead of laboriously typing out all the data, simply send the information to Quorix, which will analyze it and prepare the complaint data for you. Quorix handles this for you in both the Windows client and BabtecQ Go.
Here's how it works:
- Provide information: Upload up to 5 files (e.g., complaint letters, inspection reports, delivery slips, or photos) or describe the situation in your own words (up to 6,000 characters). You’re also welcome to do both. Supported file types include PDF, common image formats, and Word, Excel, and PowerPoint files.
- Quorix analyzes the information provided: Quorix identifies transaction data, returned parts, and associated failures, and pre-fills the fields in the newly created complaint. In doing so, Quorix also includes your additional user-defined fields.
- Inspect Suggestions: A wizard guides you step by step through transaction data, item lines, and failures. You can see at any time where you are in the process and how many suggestions Quorix has prepared for you. You must confirm each step – and you can adjust the data beforehand if needed.
- Complete: In the summary, you can see all the data you've entered at a glance. The complaint will then open directly for further processing.
Thoughtful details:
Pre-filled fields are clearly marked. For drop-down lists such as "Part“, "Customer“, or "Failure“, Quorix suggests a search term and filters the list specifically for you. Quorix also takes your additional custom fields into account – which is why you can customize the layout of the new wizard in the Windows client. And if you work with complaint templates, their content is preserved. However, if Quorix identifies information that differs from the templates while analyzing the available data, it offers this information as a suggestion for insertion.
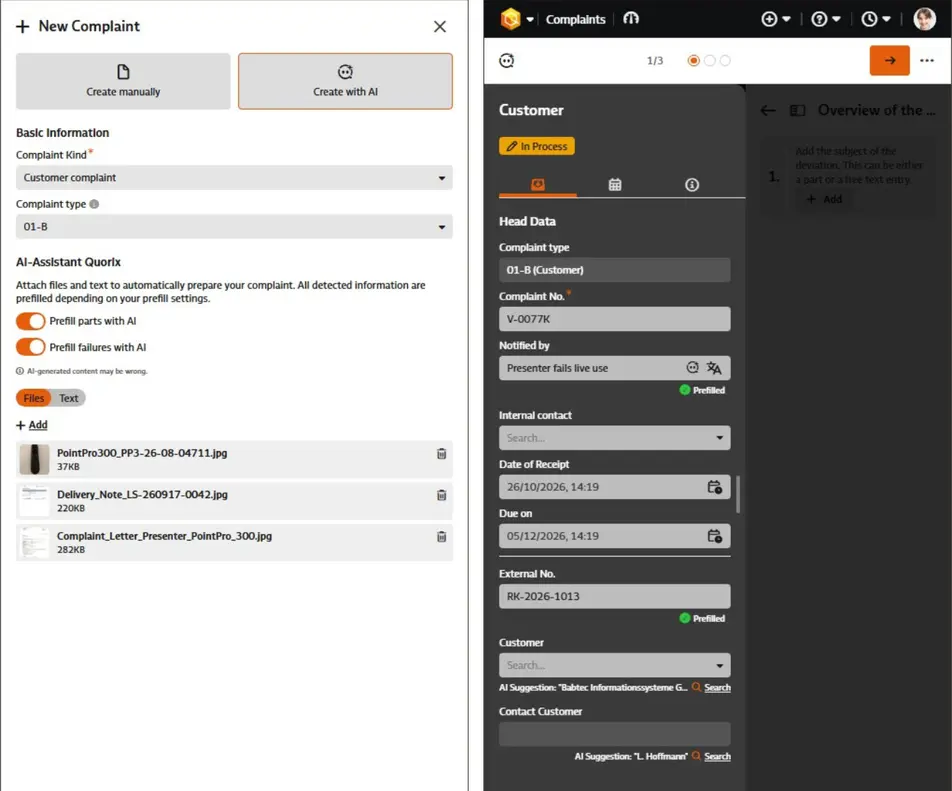
Creating a new complaint with Quorix – here the assistant in BabtecQ Go (an excerpt)
Identifying the actual failure cause of a problem is often the most challenging part of handling a complaint. Quorix now actively supports you with Ishikawa analysis and suggests relevant causes. In addition to the information about your industry or products stored in the configuration, Quorix uses the data already available in this complaint, such as the trigger, the part being complained about, the problem description, the failure, or existing causes.
Your benefits:
- Organized by cause categories: The suggestions are clearly structured. If no categories have been defined yet, Quorix uses the traditional factors of people, machines, materials, methods, environment, and measurement.
- Leveraging Knowledge from the Past: In addition to new AI-generated causes, Quorix also provides historic causes drawn from comparable past complaints. This allows your company to capitalize on its valuable experiential knowledge.
- Refine suggestions through dialogue with Quorix: In the integrated chat, you can work with Quorix to flesh out suggestions, ask questions, or have Quorix explain the context. Existing prompt suggestions provide inspiration as you work.
- It's up to you: Choose from the suggestions which causes you would like to include in the Ishikawa diagram.
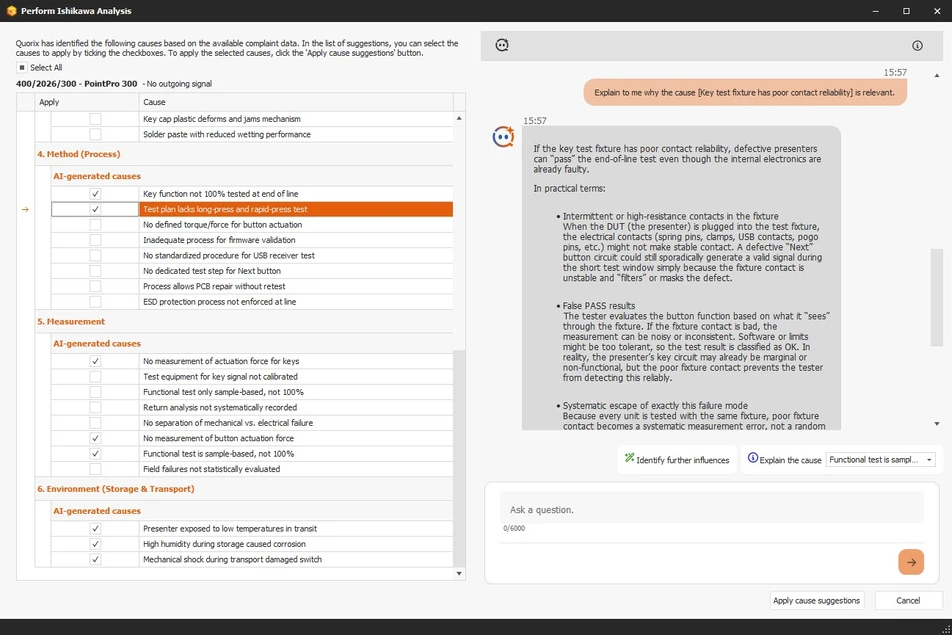
Root cause analysis with Quorix
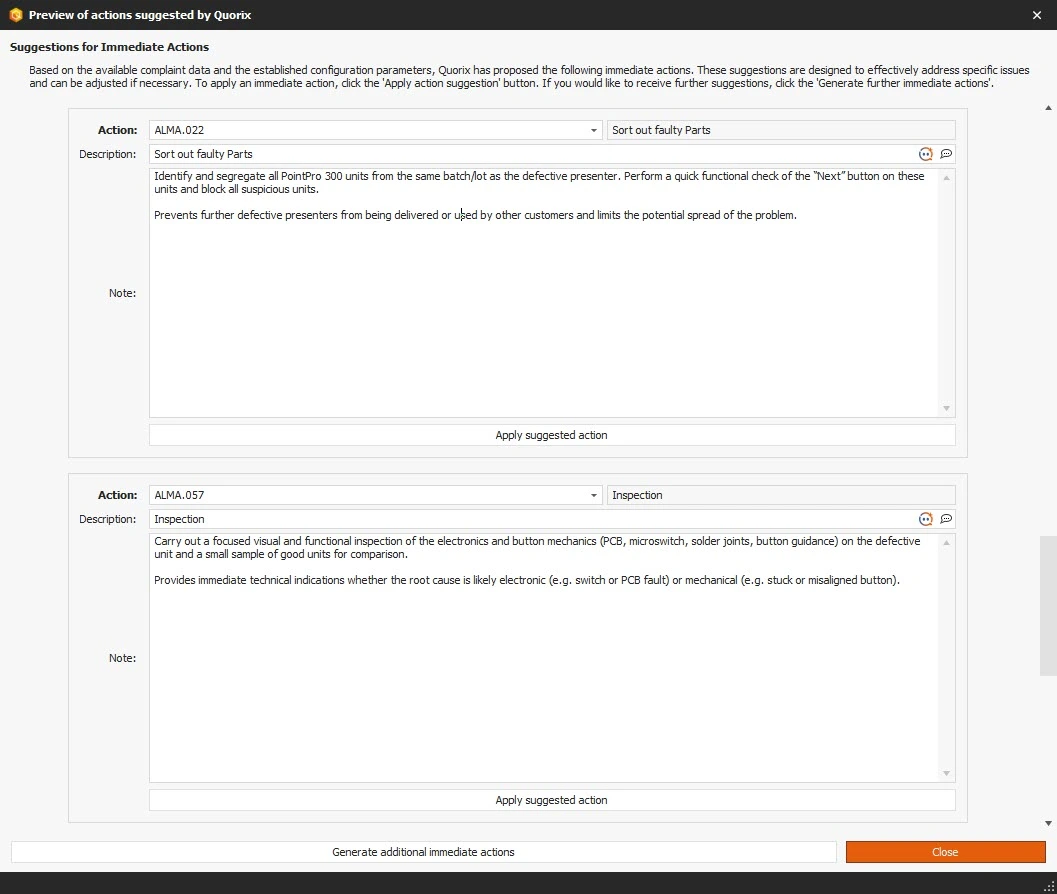
Once the cause has been identified, the focus shifts to effective actions. Based on the data already stored in this complaint, Quorix suggests appropriate immediate actions, corrective actions, and preventive actions. In doing so, Quorix takes into account, among other things, data on the part, the problem and error description, the causes, and, if applicable, any measures already in place.
Here's what you can expect:
- Integrated into your workflow: Access Quorix directly from the tree view or the 8D view. Quorix determines whether immediate, corrective, or preventive actions are needed and provides the appropriate recommendations.
- Suggestions with Justifications: Quorix initially provides 5 suggestions, each with a brief description and a note explaining the reasoning behind it. This allows you to quickly understand the recommendation from a technical perspective.
- More options upon request: Can't find what you're looking for? Request up to three additional sets of 5 suggestions – for a total of up to 20 ideas.
- Seamlessly integrated with your catalog of actions: Quorix automatically assigns a suitable action from your catalog to each suggestion – or, alternatively, the default entry configured for that action category. This allows suggestions to fit directly into your existing structures.
- Created with a single click: If you are satisfied with a suggestion in terms of its technical merit and content, simply click “Apply Action” to save the suggestion as an action in the complaint.
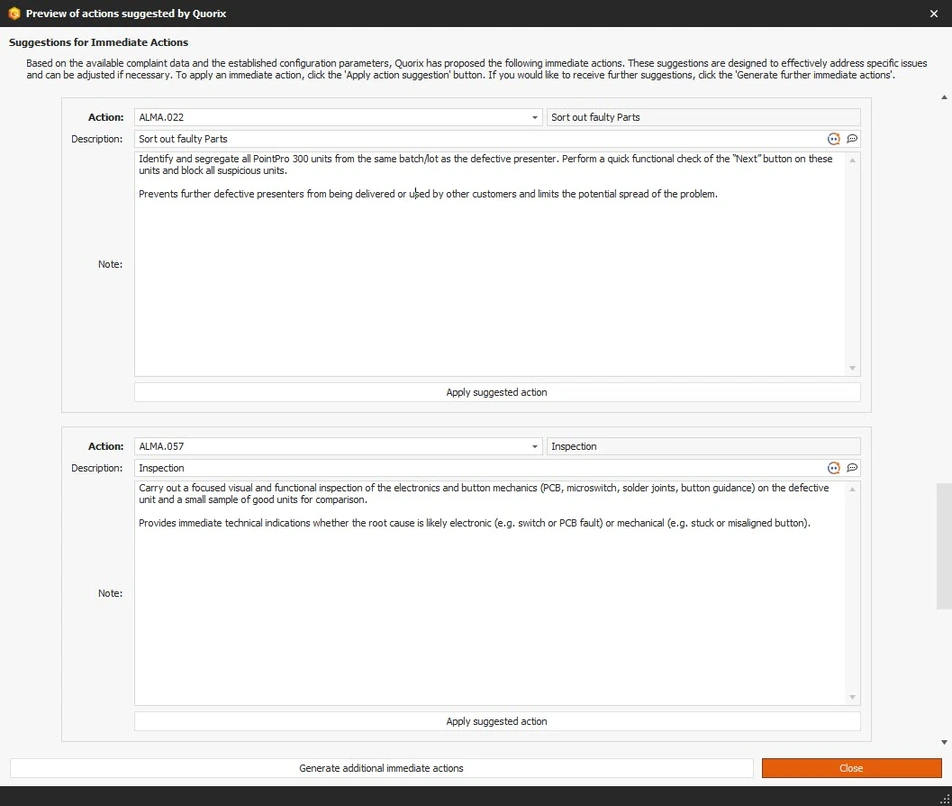
Quorix makes suggestions for measures – here immediate measures for the error
Metadata can be used to define input fields as required fields. The validation of such custom required fields in actions created in response to a complaint has been optimized. As a result, a new action can now be saved only if all defined required fields have been filled in, as expected.
Drawings | CAD Integration
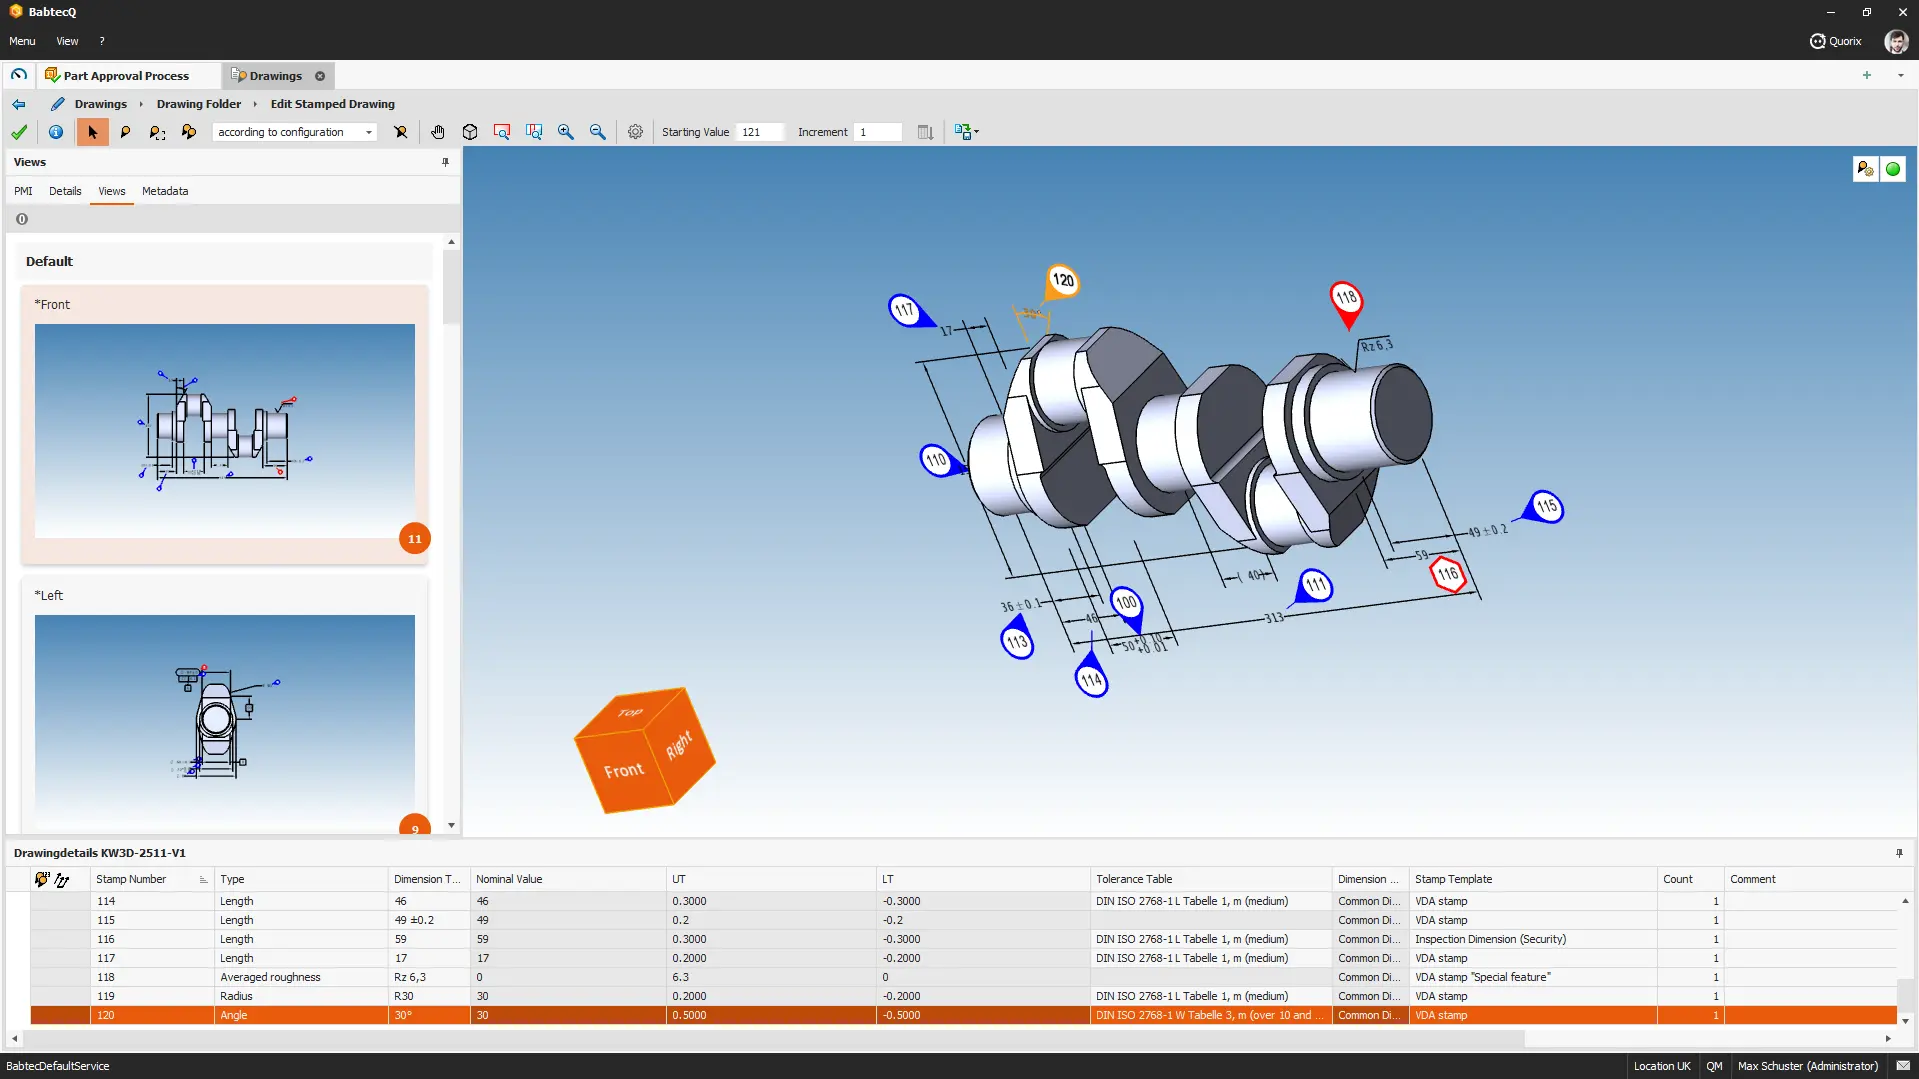
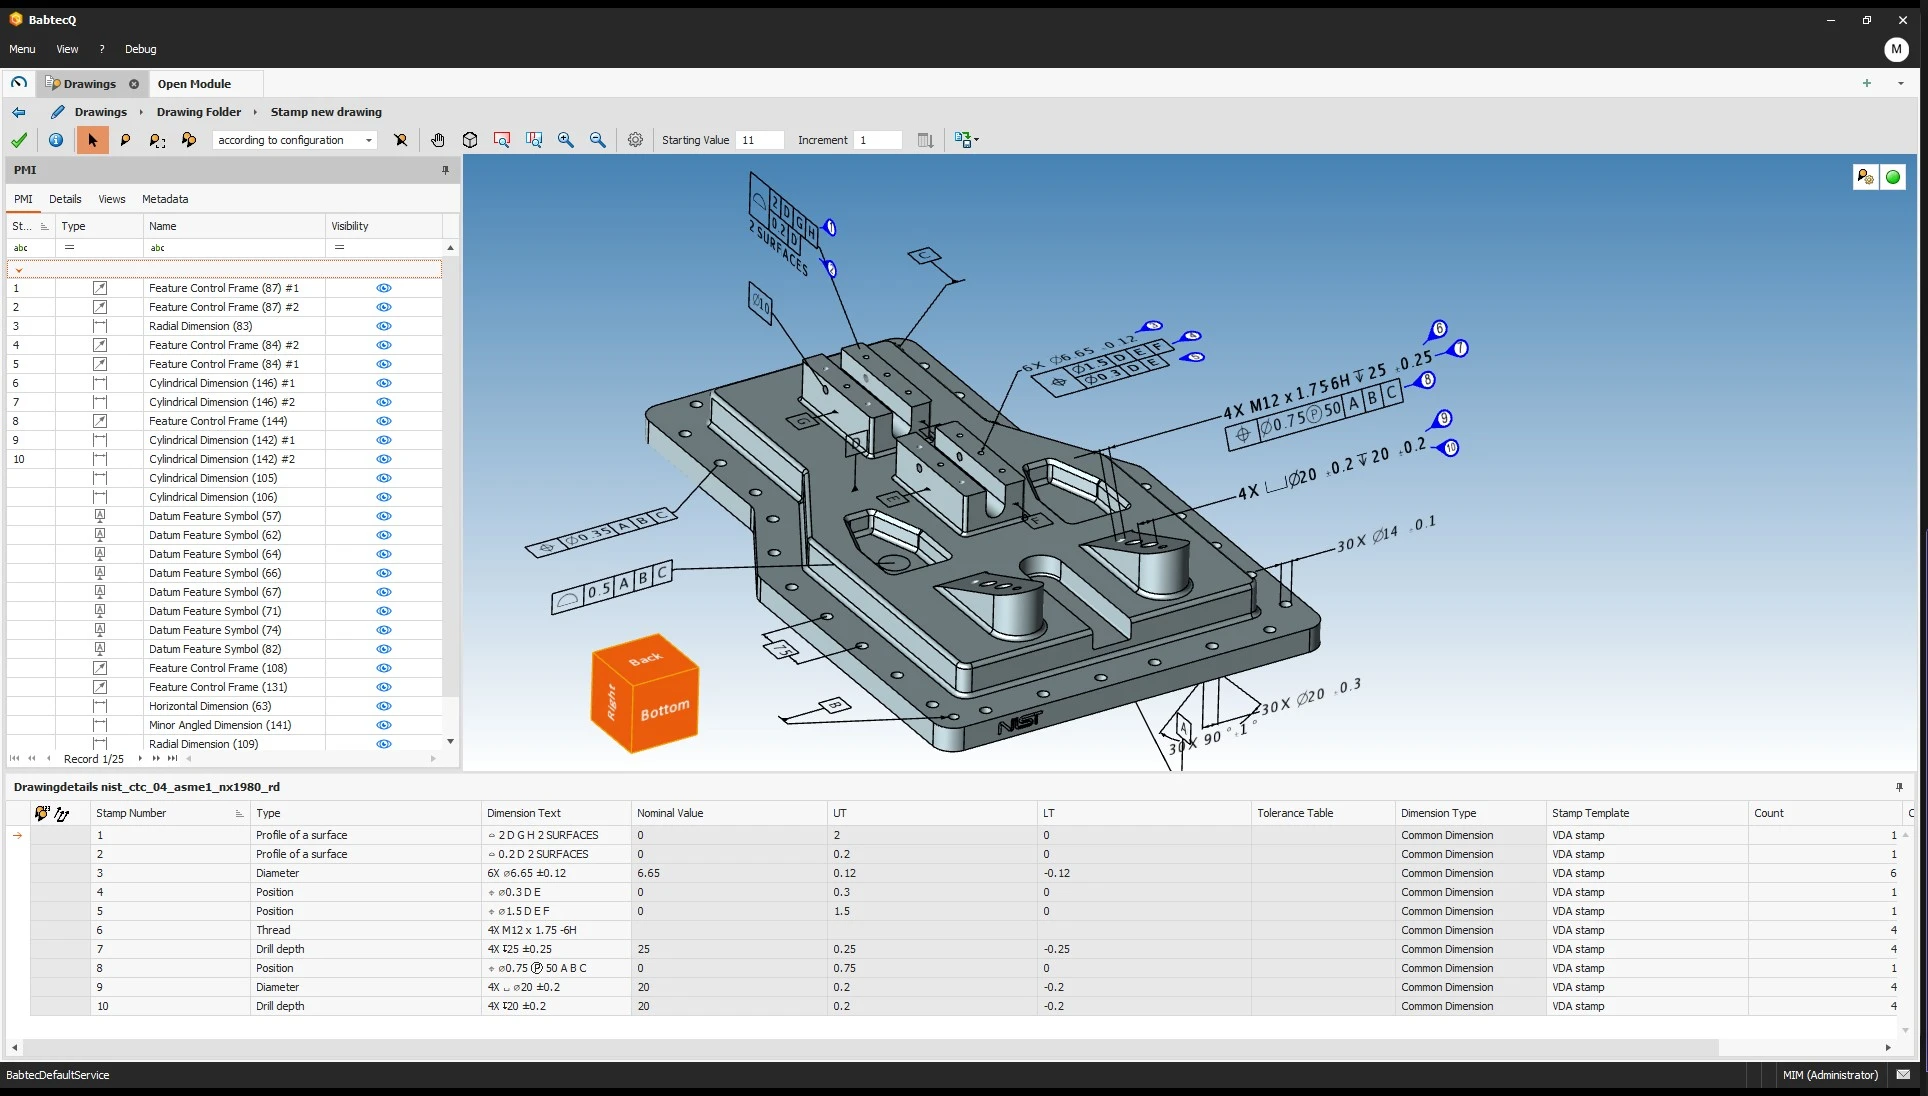
Dimensions are now also displayed directly on the 3D model, just as you are already familiar with from 2D drawings. Previously, the unique dimension numbers derived from the 3D model were only visible in the drawing dimension table.
When stamping the 3D model, the stamp symbols are automatically positioned on the model. To ensure that the stamps remain clearly visible in the CAD viewer when visualizing the models in other Babtec modules – for example, when rotating the model – you can easily reorient or move individual stamp symbols. This is particularly helpful for complex 3D models.
This means that when viewing the part in the CAD viewer, you can now more easily associate each dimension or characteristic with its position in the model, which will simplify your daily work with 3D models as part of quality assurance.
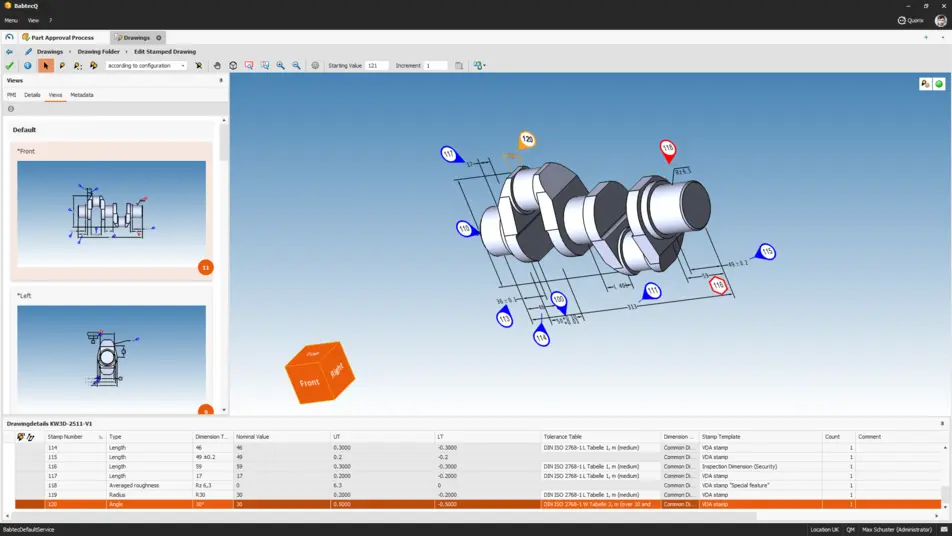
Stamp on 3D model for easy identification of derived dimensions
In 3D CAD models, drawing dimensions are automatically derived from the PMIs (Product Manufacturing Information) contained in the model. In this context, we have addressed several special cases in the new release:
- Some CAD systems create only a single PMI object for complex form and position tolerances, which then contains multiple lines. However, each line represents a single drawing dimension to be checked.
- In addition to the hole diameter, PMIs for holes also include specifications for the hole depth and, in some cases, countersinks – that is, several drawing dimensions that may be relevant for quality assurance.
- Other special cases include, for example, chamfers and similar specifications.
In order to derive all necessary drawing dimensions for these cases as well and assign a unique stamp number to each one, all PMIs contained in the 3D CAD model are now analyzed as soon as the model is opened. If any of the special cases mentioned above are identified during this process, a separate PMI is now generated for each drawing dimension to be derived, ensuring that all relevant drawing dimensions receive a unique stamp number during stamping. Manual post-processing is no longer necessary.
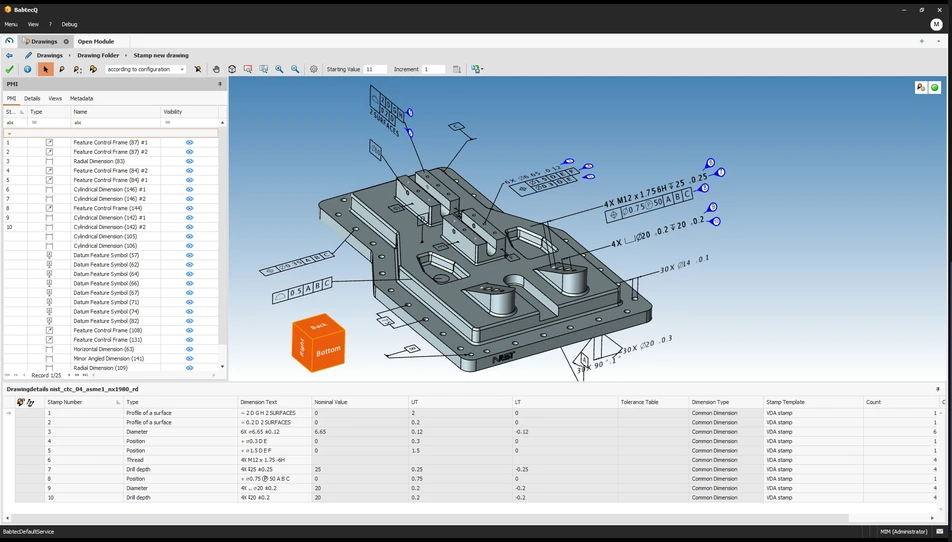
3D model with multiple stamps to a PMI (e.g., stamp number 6 for hole depth and 7 for thread) [Source: 3D model National Institute of Standards and Technology]
The import feature for ACM files (AutoCAD Mechanical) has been enhanced so that it can now also process drawings saved in version 2026.
These drawings use a new proxy definition that was not previously supported and required a workaround. This involved exporting the drawing file from AutoCAD Mechanical to a version prior to 2026 or to standard AutoCAD without Mechanical. This step is no longer necessary.
Metric thread specifications may also include a quality grade (e.g., “4X M12 x 1.75 -6H ↧25”), which has previously prevented the automatic recognition of the dimensional text. In the future, the quality class will be accepted during recognition without being further processed in terms of content.
The quality grade is indicated in the format [number 3–9][letter a–h or A–H], and may optionally be preceded by a hyphen.
A note: For now, recognition is limited to “M”-type thread specifications.
Release Information for Download
Take the Next Step Now!
If you would like to update your system, simply contact us using the form below or reach out to your Babtec contact person. We look forward to hearing from you!